Showing posts with label iPhone. Show all posts

How to Retrieve Old Pictures on iPhone without Backup


Our photos capture some of our most cherished memories and losing them can be heartbreaking. Losing pictures on our iPhone can be quite frustrating, especially when we don't have a backup. Thankfully, there are ways to retrieve old pictures on iPhone without backup. Below are some tips to help you recover your lost pictures.

Check Your Recently Deleted Folder

Recently Deleted Folder

When you delete a photo from your iPhone, it is not immediately gone forever. It first goes to the "Recently Deleted" folder, where it stays for 30 days. This gives you a chance to retrieve the photo. Here's how:

  • Open the "Photos" app on your iPhone
  • Tap on "Albums" at the bottom of the screen
  • Scroll down and tap on "Recently Deleted"
  • Tap on the photo you want to recover
  • Tap on "Recover" at the bottom of the screen

Use a Third-Party App

Third-Party App

If you are unable to find your old pictures in the "Recently Deleted" folder, you can try using a third-party app to retrieve them. Here are some popular apps:

  • Dr. Fone
  • iMyFone D-Back
  • PhoneRescue

These apps work by scanning your iPhone and recovering the deleted pictures. However, note that these apps may not always work, and some may even require payment.

Connect Your iPhone to Your Computer

Connect iPhone to Computer

If you have synced your iPhone with your computer before, there is a chance that your old pictures are still on your computer. Here's how to retrieve them:

  • Connect your iPhone to your computer using a USB cable
  • Open iTunes on your computer
  • Select your iPhone
  • Click on "Restore Backup"
  • Select the backup that contains the pictures you want to retrieve
  • Click "Restore"

Try iCloud

iCloud

If you have turned on iCloud backup on your iPhone, your old pictures may be backed up to iCloud. Here's how to retrieve them:

  • Open a web browser on your computer
  • Go to iCloud.com
  • Sign in using your Apple ID and password
  • Click on "Photos"
  • Check to see if your old pictures are there
  • If they are, select the pictures you want to retrieve
  • Click on the download icon to download them to your computer

Take Preventative Measures

Preventative Measures

While losing old pictures can be quite frustrating, it's important to take preventative measures to ensure that this doesn't happen again in the future. Here are some tips:

  • Regularly backup your iPhone using iCloud or iTunes
  • Enable the "Optimize iPhone Storage" feature in your iCloud settings. This will store lower-resolution versions of your photos on your phone while the full-resolution versions will be stored in iCloud.
  • Use a third-party app to backup your photos to a cloud-based service such as Google Photos or Dropbox.
  • Consider investing in an external hard drive to store your pictures.

Conclusion

Losing old pictures on your iPhone can be frustrating, but with the tips above, you can retrieve your photos without a backup. Remember to check your "Recently Deleted" folder, try a third-party app, connect your iPhone to your computer, and use iCloud. And, as a preventative measure, backup your iPhone regularly and consider investing in an external hard drive or cloud-based service to store your pictures.


How to Add Family Members to Your Apple Music Subscription


One of the top streaming services for all things melodic and melody-related is Apple Music. Spotify's adversary has a lot to adore, with over 72,000 million users and more than 90,000 tunes from top artists.

Apple Music offers a generous three-month trial period of free access to new subscribers. Memberships are invoiced on a monthly ($9) or yearly ($99) cycle after the trial period. Although that is comparable to the typical cost for other music streaming services, it is never a bad idea to save a little money. While Apple Music is available for $5/month to college students, an Apple Music family plan offers further savings on your subscription.

You will learn how to set up Apple's Family Sharing and add people to your account in this article. Before you know it, your entire family will be listening to music together (and helping you pay that Apple Music premium).

You'll need a few things, some of which are more obvious than others, in order to follow the steps in this article. You must first have an Apple ID, which should be available to everyone who has at least one iOS, macOS, or other Apple service. Second, you'll need a Mac running OS X Yosemite or later, or an iOS device running iOS 8 or later.

Of course, you'll also need a Family subscription to Apple Music. If you're starting over with Apple Music, make sure to select a Family subscription rather than an Individual one. It only takes a few steps to convert an Individual Apple Music subscription to a Family subscription, and step-by-step instructions can be found in the support section of the Apple website.

What is Family Sharing?

Family Sharing makes it simple to share material from several Apple services, including movies, iCloud storage, apps, and the service we're concentrating on today, Apple Music. Account administrators can host up to six users under a single family subscription for for $15 per month. Everyone in Family Sharing receives their own preferences and recommendations because they each utilize their own Apple IDs.

The best part is that when you allow purchase sharing with Family Sharing, everyone in the family can swap movies, television series, books, and music—just as long as the user who made the purchase agrees to share with the rest of the group.

Setting up Family Sharing

The Family plan for Apple Music relies on Apple's Family Sharing system rather than operating independently. Go to the next section if you already have Family Sharing configured and you just want to add additional family members. Read on if you've never utilized family sharing and are setting up your family subscription for the first time.

Setting up Family Sharing on iOS

You're in luck if you're reading this on an iPhone or iPad since Family Sharing can be set up right now in just a few easy steps.

  1. Find the Family Sharing settings: Open the Settings app and either tap on your name at the very top, or on older iOS devices, scroll down and open the iCloud settings.
  2. Tap Set Up Family Sharing: Then tap Get Started. From here, follow the prompts until setup is completed.
  3. Invite family members: If you’re using iOS 11 or later, you’ll be invited to choose the first feature you want to turn on for sharing. From here, follow the instructions to invite family members via Messages.

Setting up Family Sharing on Mac

Setting up Family Sharing on a Mac is just as simple—if not simpler—than doing it on an iOS device. There is a slight difference in the procedures.

  1. Open Settings: Click on the ever-present Apple logo in the top left of the screen, then select System Preferences. Once the preferences window is open, click on Family Sharing. For devices running macOS Mojave or earlier, you’ll click iCloud instead of Family Sharing.
  2. Start the setup process: Simply click Set Up Family, then follow the onscreen instructions to complete the process.

Invite family members

Apple Music on a smartphone.

The next step is to add family members so they can enjoy Apple Music as well, regardless of whether you've already set up Family Sharing or just followed the preceding instructions. This is something you can accomplish on an iOS, Android, or Mac device. The following is a list of each step.

iOS

  1. Find the Family Sharing settings: As mentioned above, all you need to do is open the Settings app and tap on your name at the very top, or on older iOS devices, scroll down and open the iCloud settings.
  2. Add a new family member: This is as easy as tapping Add Family Member and entering their name or email address. Then just follow the onscreen instructions.
  3. Finish setup: If you’re using iOS 11 or later, you can choose whether you’d like to invite the family member via Messages or in person.

Mac

  1. Open iCloud settings: Click the Apple icon in the top left of your screen, then open System Preferences and click on iCloud.
  2. Open Family settings: Just click on Manage Family.
  3. Add a new family member: Click the + icon, then follow the onscreen instructions.

Android

  1. Open Apple Music settings: Open Apple Music, then tap the menu icon in the upper left corner.
  2. Navigate to Account settings: Tap on your photo or name at the top of the screen.
  3. Open Membership settings: Tap on Manage Membership, then enter your iCloud password if prompted.
  4. Open Family settings: Tap on either Family or Family Setup.
  5. Add family members: If you tapped Family Setup, follow the onscreen instructions to add family members. If you tapped Family, tap Add Family Member at the bottom of the screen and follow the prompts.

Next steps

You should now be ready on your end. The only thing left to do is for your family to really begin using Apple Music. All they have to do to begin listening is sign into Apple Music using the same credentials they use for Family Sharing. Having said that, occasionally things don't turn out the way you had hoped.

If you run into trouble

Family members that use several accounts frequently log into Apple Music or iCloud (in the case of Family Sharing) with the incorrect one. If someone is having problems logging into Apple Music, that should be the first thing they check.

You or a family member may occasionally be able to access a Family subscription by logging out and back in. First, try signing out and then back in to the impacted Apple Music account. Try performing the same action with all of your Apple services if it doesn't resolve the problem. Try removing everyone from Family Sharing and adding them back if neither of those solutions work. Although this is a little tedious, if you follow the above instructions, it should go quickly.

And that's all there is to it. Check out our list of the top music streaming services if you're thinking about adding another service to provide to your family. We have instructions on how to terminate your Apple Music account in case you decide to switch to a different service.

How to Recover Photos On iPhone Without Backup


Nobody wants to experience the frustrating circumstance of losing images on an iPhone. When it does, there is one thing you should keep in mind: while the photos are not truly lost but rather wait to be overwritten, you should use that iPhone as little as possible or turn it off in order to enhance your chances of retrieving them directly from the device without backup files. Any action that writes to the space, such as adding new images to an iPhone, will permanently wipe any previously deleted photos.

In other words, it's recommended for you to cease using the iPhone right once if you can't locate and recover the photographs from the "Recently Deleted" album in the Photos app. It would be dangerous to carry out the restoration method on iPhone unless you are certain that the images were included within an iCloud backup before deletion.

Recovering iPhone Photos Without Backup Files

Apple primarily offers two offline and online options for data backup and restoration, including photo backup and restoration using iTunes or iCloud. However, if you are now reading this post, it is likely that your search for a way to recover your iPhone's images without a backup file has come up empty. Fortunately, there's still a significant chance that those photographs can be recovered with the iOS Data Recovery third-party file recovery app.

It is essentially a reliable solution for retrieving images and other iPhone information without the need for backup files. It is built with a sophisticated scanning engine that can perform a comprehensive scan of the iPhone's memory and display the files you can recover. Additionally, it offers preview and search features, enabling you to individually or in bulk recover files.

The next tutorial covers the detailed directions for restoring images on iPhone without making backup files earlier. Let's start to see how it gets the job done.

Guide: How to Recover Photos from iPhone without Backup File

Step 1: Connect iPhone to computer

The startup interface will show up once you have installed and launched the application on your computer.

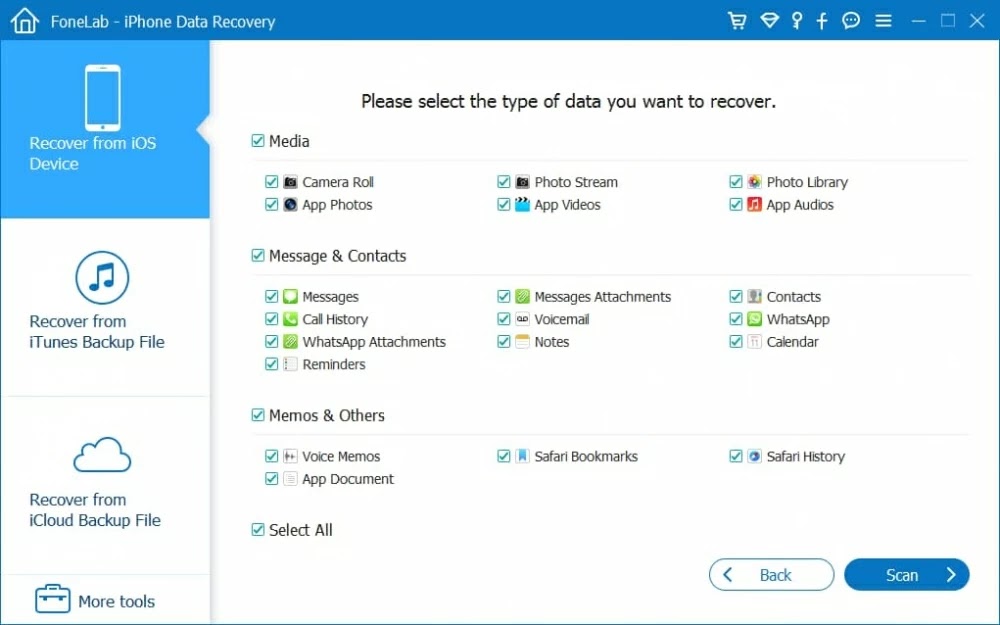
You can only restore lost images from your iPhone's memory if it has no backups. To accomplish this, select "Recover from iOS Device" mode from the menu on the interface's left. Next, get a USB cord and connect your iPhone to the computer using it.


After that is complete, the program will automatically search for your connected iPhone and display its image, name, and current generation on the right pane.

Step 2: Scan the iPhone memory for deleted photos

Choose the data type you want to scan for and recover at this point. In this case, select "Camera Roll," "Photo Stream," and "Photo Library" before clicking the lower-right Scan button to start a deep scan of your iPhone.

Simply wait while the app searches the memory of your iPhone for items; you can see the scan's progress in the display.

When the scan completes, the application offers up an intuitive summary of all sorts of files. Additionally, the numerous categories displayed on the left side help you find the precise files quickly.

Step 3: Choose the deleted photos for recovery

It's time to decide what you want to restore at this point. When you're ready to recover iPhone photos, click here "Camera Roll" category (or "Photo Library", "Photo Stream", "App Photos" category) under "Media" section from the left pane, then look at the repaired photographs on the right pane.

You can flip the "Only display the deleted items (s)" option to ON at the right pane's top if you simply want to look at and recover deleted photos. 

Step 4: Start retrieving photos straight from iPhone without backup file

Once your photos have been chosen, click the Recover button in the lower right corner to bring up a pop-up box where you may choose where to save the recovered photos. On your computer, you can select a different path or just utilize the default output folder.


On order to start the process of recovering your iPhone images, press the Recover button in the pop-up box. Depending on how many photographs you've chosen, this can take some time.

After that, check the photographs by opening the destination folder on your computer.

Restoring Photos from iCloud Backup

It is possible and simple to restore images to your iPhone from an iCloud backup if you have an iPhone backup.

  • Tap on Settings > General > Reset > Erase All Contents and Settings.
  • When you get to the "Apps and Data" screen, tap Restore from iCloud Backup.
  • Enter your Apple ID and password.
  • Select the backup you want to restore photos from.

The process of restoring your images from an iCloud backup should take some time.


Retrieving Pictures from an iTunes Backup

You can connect your iPhone to iTunes and use it to restore images from a backup if you decide to back up your iPhone using iTunes and keep the backups on your computer.

  • Connect your iPhone to your computer and launch iTunes.
  • Click on the device icon when it displays in the iTunes window.
  • Go to Summary tab and select Restore Backup...
  • Select a backup from a list of archives available, click Restore.


Conclusion

Using iOS Data Recovery, you may learn a lot more about restoring images on an iPhone without backup data. The program is generally easy to use and walks you through a successful recovery process. Remember that every Apple customer should backup their iPhone data to prevent data loss.

Free How-To Tutorials

Search This Blog

Menu Halaman Statis