Showing posts with label Computing. Show all posts

Bridging The NTFS Gap Between Windows and OS X


If you’ve ever tried transferring files between a computer running Windows and one running Mac OS X, chances are you’ve faced the problems arising due to NTFS and FAT formats. Windows, by default prefers using NTFS formats on it’s drives, and if you have formatted external hard disks and pen drives on Windows, you most probably have used NTFS to format those.

That’s all well and good in the Windows universe, but switch over to a Mac and you’ll notice how OS X can read those NTFS formatted disks but not write anything to them. That’s one of the biggest problems in cross platform compatibility for external data storage between Windows and OS X.

What We Can Do

The most common solution you’ll hear to this is to format drives in FAT. While this works, we’ll give you two reasons why you might not want to do this:

  1. Your disk might already contain valuable data that will be lost if you format it into FAT.
  2. You might need to transfer files larger than 4GB into your disk, and FAT doesn’t allow this.

So, how to bridge this glaring gap between Windows and OS X?

We explore the possible solutions to this problem today. However, before you can understand what to do, you need to understand what it is that you are trying to fix. A little background is in order:

NTFS and FAT are two of the most commonly used file systems to format drives. These are abbreviations for New Technology File System and File Allocation Table, respectively. These formats govern how disks arrange data.

Using FAT can actually fix most of your problems with using the same external storage between Windows and Mac, however, there’s the caveat that files larger than 4GB can not be stored inside disks formatted using FAT.

How to Enable NTFS Write Capabilities on OS X

OS X natively supports reading capabilities for disks in the NTFS format. This means that you can use your NTFS formatted disks with OS X to read files from. However, you can not transfer files from your Mac to the disk in question.

So, you’re flummoxed? Don’t worry, we have the fix, and we are going to explain it to you. As it turns out, there are two possible solutions to this problem.

1. Third Party Applications

Obviously you were not the first to encounter these limitations, so problem solvers have come out with solutions in the form of third party apps. These come in both paid and free variations, but before you skip ahead to the free section, be warned, the free one takes a lot more hard work and is generally not as reliable as the paid ones.

Paid Applications

The awesome people at Paragon Software Group and Tuxera have created utilities that bridge the NTFS gap between Windows and OS X.

All you need to do with these apps is download them (and install, obviously.) and you’re all set. Well, almost. You do need to restart your computer for the changes to take effect, and then you can freely read/write on NTFS drives without any hassle.

“Paragon NTFS for Mac” is priced at $19.95 and has a 10 day trial if you want to be sure that it works out for you.

“Tuxera NTFS for Mac” is priced at $31 and has a 15 day trial.

Both of these apps come with the added functionality that allows you to format a drive using NTFS or create partitions. We have tried Paragon’s offering and it’s well worth the price.

Also, note that if you’re using a Seagate drive, Seagate offers a free license for “Paragon NTFS for Mac”, with the limitation that it only works with Seagate drives, or with drives that are manufactured by Seagate. I could use it with a Samsung external HD that was manufactured by Seagate.

Check out Paragon and Tuxera for an easy, hassle free NTFS experience on your Mac.

ntfs paragon

Free Applications

“osxfuse” is an open source application hosted on GitHub that also allows users to write to NTFS drives on Mac. The process is tediously long, and not recommended if you’re not comfortable with using the Terminal, or rebooting your Mac into recovery mode.

Nevertheless, we have outlined the steps here.

1. Download osxfuse and install it.

2. Download Homebrew (a command line package manager for Mac), if you don’t have it already.

3. Open Terminal, and type the following command:

brew install homebrew/fuse/ntfs-3g

4. Now, you’ll have to disable System Integrity Protection (SIP, or “rootless”). To do this, you need to reboot into recovery mode.

  • Turn your Mac off and press Command + R while starting it up again. This will boot up your Mac in a recovery environment.

5. Launch Terminal and type the following command:

csrutil disable

  • This will disable System Integrity Protection on your Mac.
  • Reboot your Mac normally.

6. Open Terminal and type the following commands:

sudo mv /sbin/mount_ntfs /sbin/mount_ntfs.original
sudo ln -s /usr/local/sbin/mount_ntfs /sbin/mount_ntfs

7. Next, you to re-enable System Integrity Protection.

  • Reboot your Mac into recovery.

8. Launch Terminal and type the following command:
csrutil enable

  • This will enable System Integrity Protection on your Mac.

9. Reboot your Mac.

10. NTFS should now be working on your Mac.

ntfs homebrew osxfuse

Ok, that was a lot of work to do. Especially, considering how there are much simpler and easier methods available. Also, disabling System Integrity Protection is not something that should be done lightly as it allows root programs to access protected files on your Mac and might make your Mac an easy target for malware, or lead to corruption in your startup disk.

2. Apple’s Experimental Feature

As it turns out, Apple themselves have an experimental feature that can be enabled to allow NTFS writing capability on the Mac. This method also requires the use of command line, but it does not require you to disable System Integrity Protection.

Note: Being an experimental feature, this might not work well, it might corrupt your data, your disk, or cause data loss. Proceed with caution, and at your own risk.

The steps you need to take, in order to enable this feature are given below:

1. Fire up Terminal on your Mac.

2. Type the following command:

sudo nano /etc/fstab

  • You need to add the following line to the file:
    LABEL=DRIVE_NAME none ntfs rw,auto,nobrowse
  • Replace the DRIVE_NAME with the name of your disk.
  • Make sure the DRIVE_NAME you are using does not contain any spaces as this might cause issues.

3. This will enable write support for your drive.

If your drive has a complex name with spaces and the like, you can use the device UUID to enable write support for that drive as well. To find the UUID for your disk, you need to run the following command on the Terminal:
diskutil info /Volumes/DRIVENAME | grep UUID

Replace the “DRIVENAME” with the name of your disk.

Once you have the UUID for your disk, you need to follow these steps:

1. Open Terminal on your Mac

  • Type the following command:
    sudo nano /etc/fstab
  • Add the following line to the file:
    UUID=DEVICEUUID none ntfs rw,auto,nobrowse
  • Replace “DEVICEUUID” with the UUID for your disk.

The limitation with this experimental method, is exactly that; it’s experimental. There is no guarantee that it will work properly. It might corrupt your data, or even corrupt your entire disk. Also, this method requires you to add one line “per disk” for it to work. So if you have more than one disk that you want to write to using this method, it’ll be unnecessarily tedious.

Future Possibilities

The fact that Apple has an experimental feature to enable writing capabilities for NTFS disks hints a little bit at a possible native support for NTFS writing. That is good news, but it is also unconfirmed. For all we know, Apple might completely remove NTFS writing support from the OS, leaving users with no choice but to use third party applications.

If you have the option, we suggest that you format your disks using exFAT. exFAT is a format that is supported by both Windows and OS X and it does not have the 4GB file size restriction that FAT does.

However, like almost everything in technology, exFAT too has a caveat in that it might not be supported by older versions of OS X and by Windows machines running Windows XP and older. This means that if you constantly find yourself sitting in front of a computer running Windows XP or older, then exFAT is not the best choice for you as it might not even get detected by the older operating systems.

Start Using NTFS on Your Mac

You have been armed with the essential knowledge that you need in order to make writing to NTFS files on your Mac a reality. Try out the methods we have outlined in this article and let us know about your experience with the tools you use to achieve these results on your computers.

Make sure you create backups of important data before trying out things that you are not entirely sure about. Better safe than sorry.

Let us know about your experience with NTFS on Mac in the comments below.

21 Tips To Speedup Your PC


Personal Computers / Laptops don't have an endless life, with time, both software and hardware wear out. This leads to slower PC performance and overall bad experience. You may not be able to achieve same PC performance as when you bought it, but that doesn't mean you can't get a significant increase in performance. With some simple tweaks or may be some upgrades, you can easily get a boost in performance.

Furthermore, if you don't maintain your PC properly, there might be tons of obsolete data, viruses or hardware issues that may be slowing down the system. All this can be easily fixed, if you just dedicate some time to your PC and follow our Tips.

Below you will find some simple tips and tricks that can be easily followed to get a significant increase in performance. Just follow all the tips that you can easily follow, and you will definitely see some positive results.

Here is How To Speed up Your PC /Laptop

1. Restart your PC

Before we start playing around with PC’s hardware or software, it is best to just give your PC a fresh start. While running, your PC goes through many processes, and some just keep working in the background even if you close the program. 

Restarting the PC is  a good way to get rid of the processes and have a fresh start. When your PC will boot, there will be no additional process until you start opening and closing applications. 

2. Cool it down

If your PC is running straight for past 3 days (that MMORPG farming is important, but not worth the damage), then the poor thing deserves a rest. PCs slow down when they heat up, just turn it completely off for 2-3 hours and start using again.

If your PC heats up quite quickly, make sure its fan is clean and use a cooling pad for your laptop (if required).

3. Adjust Computer’s Visuals for Best Performance

The default option for your Windows is set to use animations and attractive themes. You can set a basic theme and disable all fancy visuals effects to get a better performance. You can do so from the “Personalize” option of your Windows, which should be in the context menu when you right-click on the desktop.

You can either customize it manually or use AVG PC Tune Up to let the software select the optimum performance settings for you.

4. Use a Simple Desktop Background

If your PC is having a performance issue, then never use live wallpapers or screen savers. For all the visual effects, these wallpapers use your PC resources. Windows default background is quite light, just use that.

5. Disable Windows 10 Update Bandwidth Distribution (If you are on Windows 10)

By default Windows 10 uploads all the Windows 10 updates downloaded on your PC to other Windows 10 users, which uses your Bandwidth and PC resources leading to slower speed and browsing. Fortunately, you have the option to turn off this distribution.

To turn off  bandwidth distribution, click on "Settings” in the Start menu, and in there, click on "Update & Security".

Image 001

Image 002

Now click on "Advanced options" in "Windows Update" option, and click on "Choose how updates are delivered" on the next page.

Image 003

Image 004

Here, just click on the blue slider button to turn off this feature.

Image 005

6. Scan your PC for Malware and Viruses

Tips-to-increase-PC-Performance (6)

If your PC contains Viruses, Malware, Spyware, and other such bad programs, then you may see a decrease in performance. They may work hidden in the background to damage or expose your data, and in the process they also use your PC's valuable resources.

Use a good antivirus and anti-malware program to make sure your PC is clean. For this purpose, Avast Antivirus and Malwarebytes (anti-malware) are great tools.

7. Clean Registry

Tips-to-increase-PC-Performance (7)

Windows keeps all the system and application changes in the registry, and with time some entries may obsolete and slow down Windows processes. Thankfully, there are many registry cleaning tools that will clean the registry for you.

The most simple and free to use tool for this will be Wise Registry Cleaner. It has one-click operation, and it is extremely light and powerful tool.

8. Defrag the Hard Drive

Tips-to-increase-PC-Performance (8)

As you add data in your PC, the data gets scattered all over the hard drive and makes it hard for the system to search for files. You can defrag the hard drive to arrange data in a sequence so the system could easily find the specified file.

Windows comes with this feature built-in, just type "Disk Defragmenter" in the start menu search and you will find the tool. Run it on all your drives and you should see a slightly smooth performance. You can also try a Third-party defragmentation tool that may also offer some added features. For this purpose, you can use IObit's Smart Defrag, which is a feature rich.

9. Disable Startup Programs

Startup programs can slow down your PC boot time and leave processes in the background that slow down your PC performance. To disable startup programs, press Windows+R and type in "msconfig" in "Run" dialog.

Tips-to-increase-PC-Performance (1)

Now, navigate to the "Startup" tab and you will find all the programs that startup with your PC. Just uncheck all the programs you don't want to start with the PC and click on "OK" to apply changes.

Tips-to-increase-PC-Performance (2)

10. Clean up your Browser Data

Tips-to-increase-PC-Performance (4)

While browsing, your browser stores all the temporary data in your PC that will not get automatically deleted. It will slow down your PC, your browsing and take unrequired space on your hard drive. You can use a dedicated tool to clean your PC and the browser to get some performance boost.

For this purpose, CCleaner is a renowned tool that will get the job done for free. Just download the tool and scan your PC to find and delete all the unrequired data. Furthermore, if you are facing slow speed while browsing, then you should also delete all the unwanted add-ons and extensions.

11. Don't use Google Chrome

Although, Google Chrome is one of the best browsers, but it is also very resource hungry. Your PC might not be able to handle Google Chrome, which leads to slower browsing. Fortunately, there are many light Google Chrome alternatives that are very resource friendly and offer the similar features as Chrome.

You can use browsers such as, Firefox, Opera or Safari (if you are a Mac user), instead of Chrome.   

12. Delete Duplicate Files

Tips-to-increase-PC-Performance (10)

With time, your PC may build-up duplicate files like media files, documents or even system files due to copy/pasting between device or any other similar reasons. These files are useless to the PC, and just take up space and get in the way of system while find other data.

You can use a good third-party duplicate file deleter to view and get rid of all duplicate files. A good tool for this would be Duplicate Cleaner, which will let you filter and delete duplicate files. However, check each and every file you are about to delete as you may delete a duplicate system file that may be required by the system.

13. Use a PC Performance boosting Software

Tips-to-increase-PC-Performance (3)

There are many PC performance booster tool available both free and paid that will optimize your PC for best performance. These tools don't swing a magic wand to increase performance, they just get rid of all the junk and tweak your system settings for optimum performance. So don't expect unrealistic results, if your PC is messed up you may get a huge performance boost and vice versa.

The best free tools for this purpose are IObit Advanced System Care Free and Glary Utilities. If you are looking for a paid tool with more features then you might like to try out iolo System Mechanic.

14. Get rid of Unrequired Programs/Softwares

Tips-to-increase-PC-Performance (9)

There is a chance you or any other app might have installed different programs that you may never need. These programs take up precious space and also get in the way of system while it is searching for other data. There is no automatic process, you will have to manually check the programs you don't need and delete them.

In Windows, just type "Uninstall Programs" in the Start menu search and select "Uninstall programs". You will see all the programs installed in your PC, double-click on the program you want to uninstall.

Furthermore, make sure your "Recycle bin" is empty, as deleted programs still take space as long as they are in the "Recycle bin".

15. Turn off background process

If there are any programs that are working in the background, such as cloud storage (Dropbox, Google Drive, One Drive, etc), updaters, uploaders and monitoring software, etc., turn them off. Background processes eat up your PC’s resources while you are working on an important task, so it is better to turn them off when you don't need them.

16. Upgrade to Latest OS Version

Make sure you have the latest Version of the OS you are using. For example, if you are a Windows user, then make sure you Upgrade to Windows 10 (which is free, actually). New versions of OS are more stable and offer better security, features and performance.

Although, do check the system requirements for a particular OS before upgrading. If your PC can't handle it, it may lead to decrease in performance.

17. Upgrade RAM

All of the running programs in your PC use PC's RAM to run. So, the more programs you want to run, the more RAM you will need. You can increase the RAM by purchasing more RAM and adding it to your PC. However, if you don't know which RAM to get and how to add it, then go to your near computer shop and let them handle it or get advice.

18. Use ReadyBoost

There is also a way to get more RAM using one of your USB flash drives. The free space in a USB flash drive (compatible one) can be turned into RAM for your PC using the "ReadyBoost" feature of USB drives.

Just insert a USB drive with some empty space (at least 256 MB), and go to its properties by right-clicking on it. If the USB is compatible, you will see a "ReadyBoost" tab in properties, navigate to it. Now, select the option "Use this device" and set how much RAM you want to use from the below slider. Your PC will immediately accept it and use all the specified space as PC RAM, leading to big boost in performance.

Tips-to-increase-PC-Performance (5)

19. Use a Bigger hard drive or SSD

If you are low on storage space, then you might see some slow performance. either free up a lot of space by deleting data or buy bigger hard drive and move all the data to it. If you can afford to buy an SSD, then it is a far better option when it comes to speed.

SSDs use chips to store data, not physical parts. This is why they are very fast as compared to standard hard drives. But they are almost double the price of a hard drive, so make your decision accordingly.

20. Reinstall Windows

If you think your PC is just too much bloated and full of bad softwares, then you might like to get rid of everything and start over again. Reinstalling Windows will delete all the data inside it, so make sure you have backup of all your important data before reinstalling.

You can reinstall Windows from the "Backup and Restore" option of Windows. This will factory reset your Windows and make it same as it came when you bought it.

21. Remove Bloatware

Bloatware are built-in programs added by software companies when you buy the PC. They are there to reduce the cost of the machine you are buying by profiting from the software companies.  These softwares just startup with your PC and keep eating up resource in the background and also take up precious space.

However, you are not bound to have them installed in your PC to use Windows. Just uninstall all the bloatware programs using the standard uninstall process, if you don’t need them, of course.

If you will factory reset afterwards, all the bloatware will again get installed. So it is recommended that you create a custom image after deleting all the bloatware.

Conclusion

Most of the above mentioned methods are completely free to use and very effective. However, you are free to checkout paid alternatives as well to gain the best results. You should also know the limits of your PC while following the above tips. If your PC is not powerful enough, it may not be able to handle the tasks you want it to do.

You can checkout your PC specifications by pressing Windows+R keys and typing "Dxdiag" in the "Run" dialog. This will show all your PC hardware and software specifications, keep them in mind while trying to run multiple or resource hungry programs.

Note: Whether you are running Windows 10, 8.1, 8, 7 or XP, these tips will definitely help you to speed up your slow PC.

Enhance Your Connectivity with Verizon WiFi in NYC


Living in the bustling city of New York can be an exhilarating experience, but it also comes with its fair share of challenges. One such challenge that many New Yorkers face is finding reliable and high-speed internet connectivity. In a city where time is of the essence, having a fast and efficient internet connection is essential for both work and leisure activities.

The Solution: Verizon WiFi

Verizon, a leading telecommunications company, has long been known for its exceptional service and reliable network coverage. In recent years, Verizon has expanded its offerings to include cutting-edge WiFi solutions that cater specifically to the needs of New York City residents.

Verizon WiFi is designed to provide seamless connectivity, allowing you to stay connected wherever you go in the city. Whether you're working from home, exploring your favorite coffee shop, or simply enjoying a leisurely stroll through Central Park, Verizon WiFi ensures that you're always connected to the digital world.

But what sets Verizon WiFi apart from other internet service providers in NYC? Let's delve into the features and benefits that make it an exceptional choice for enhancing your connectivity experience:

Blazing Fast Speeds

When it comes to internet connectivity, speed is everything. Verizon WiFi utilizes state-of-the-art technology to deliver lightning-fast speeds, ensuring that you can browse, stream, and download with unparalleled efficiency. Whether you're watching your favorite TV show on a streaming platform, video conferencing with colleagues, or engaging in online gaming, Verizon WiFi provides a seamless experience without any lag or buffering issues.

Reliability You Can Count On

Unreliable internet connections can be incredibly frustrating, especially when you're in the middle of an important task or trying to enjoy your favorite online content. With Verizon WiFi, reliability is never a concern. Their robust network infrastructure and advanced technology ensure a stable and consistent connection, allowing you to work, study, or unwind without interruptions.

Wide Network Coverage

One of the biggest advantages of Verizon WiFi is its extensive network coverage throughout New York City. Whether you're in Manhattan, Brooklyn, Queens, or any other borough, you can count on Verizon's network to keep you connected. Say goodbye to dead zones and unreliable connections in certain areas of the city — with Verizon WiFi, you can enjoy uninterrupted connectivity no matter where you are.

Seamless Integration with Verizon Services

As a Verizon customer, you can take advantage of the seamless integration between Verizon WiFi and their other services. If you're already subscribed to Verizon mobile plans or home internet services, you can bundle your WiFi plan with your existing services, resulting in cost savings and a unified billing experience. Additionally, Verizon offers dedicated customer support to assist you with any queries or technical issues you may encounter.

Secure and Private Connection

In today's digital age, privacy and security are of utmost importance. Verizon WiFi prioritizes your online safety by providing a secure and private connection. Their advanced encryption protocols and robust security measures ensure that your personal information and online activities remain protected from potential threats.

Verizon WiFi NYC

Conclusion

When it comes to enhancing your connectivity in the vibrant city of New York, Verizon WiFi stands head and shoulders above the competition. With its blazing fast speeds, unwavering reliability, extensive network coverage, seamless integration with other Verizon services, and commitment to privacy and security, Verizon WiFi offers an unparalleled internet experience.

Don't let unreliable internet connections hinder your productivity or enjoyment of online activities. Upgrade to Verizon WiFi today and unlock the full potential of connectivity in the city that never sleeps.

Discover the Best Verizon Fios Plans in NYC


verizon fios plans nyc

Enhance Your Digital Lifestyle with Lightning-Fast Internet

Welcome to the world of Verizon Fios, where cutting-edge technology meets unbeatable performance. If you're looking to elevate your digital lifestyle to new heights, you've come to the right place. In this article, we'll delve into the exciting world of Verizon Fios plans available in the vibrant city of New York. Get ready to experience internet speeds that will leave you amazed!

Why Choose Verizon Fios?

Verizon Fios is renowned for its fiber-optic internet service, delivering lightning-fast speeds and unparalleled reliability. Unlike traditional cable providers, Fios utilizes a cutting-edge fiber-optic network that allows for exceptional data transfer speeds, enabling you to seamlessly stream, game, and work from the comfort of your home.

With Verizon Fios, you can kiss those frustrating lag times and buffering issues goodbye. Whether you're a hardcore gamer who demands zero latency or a movie buff who craves uninterrupted streaming, Fios has got you covered.

Verizon Fios Plans in NYC

Let's dive into the exciting range of Verizon Fios plans available in the heart of the Big Apple. Whether you're a solo internet user or a large family with multiple devices, Verizon has tailored plans to suit your needs and budget.

1. Fios Internet 200 Mbps

If you're looking for a reliable internet connection that can handle your everyday online activities, the Fios Internet 200 Mbps plan is an excellent choice. With download speeds of up to 200 Mbps, you can browse the web, stream your favorite shows, and connect with friends and family without a hitch. This plan is perfect for individuals or small families who require a solid internet connection.

2. Fios Gigabit Connection

For those seeking the ultimate internet experience, the Fios Gigabit Connection plan is the way to go. With mind-boggling download speeds of up to 940 Mbps, this plan is designed to handle even the most demanding online tasks. Whether you're a heavy gamer, a work-from-home professional, or a tech-savvy household with multiple devices, this plan will exceed your expectations.

3. Fios Gigabit Connection with TV

Looking to bundle your high-speed internet with an impressive selection of TV channels? Verizon Fios has you covered with the Fios Gigabit Connection with TV plan. With lightning-fast internet speeds and access to an extensive range of channels, including popular networks and premium options, you'll never miss out on your favorite shows or live sports events. It's the perfect combination of entertainment and connectivity.

4. Fios Business Plans

For entrepreneurs and businesses in NYC, Verizon Fios offers a range of business plans designed to keep you connected and productive. From high-speed internet to dedicated business phone lines and advanced cloud services, Fios Business Plans provide the essential tools to drive your business forward. Experience reliable connectivity and unrivaled performance, ensuring your business stays ahead of the competition.

The Benefits of Choosing Verizon Fios

1. Blazing-Fast Speeds: With Verizon Fios, you'll enjoy lightning-fast download and upload speeds, allowing you to seamlessly browse the web, stream content, and download large files in a matter of seconds.

2. Reliable Connection: Fios utilizes a cutting-edge fiber-optic network, ensuring a reliable and stable internet connection even during peak usage times.

3. Superior Gaming and Streaming: Whether you're an avid gamer or a binge-watcher, Fios' exceptional speeds and low latency provide an immersive gaming experience and buffer-free streaming.

4. Excellent Customer Service: Verizon's commitment to customer satisfaction means you can rely on their dedicated support team to address any concerns or technical issues promptly.

5. Bundle Options: With Verizon Fios, you can bundle your internet plan with TV and phone services, creating a comprehensive package that caters to all your digital needs.

Subscribe to Verizon Fios Today!

Don't settle for less when it comes to your internet connection. Experience the power of Verizon Fios and unlock a world of limitless possibilities. Whether you're a casual internet user, a dedicated gamer, or a business professional, Verizon has the perfect plan to suit your requirements.

Visit the Verizon website today to explore the full range of Fios plans available in NYC. Elevate your digital lifestyle and enjoy the wonders of lightning-fast internet with Verizon Fios.

How Long Does It Take To Vote Online?


Online voting, at its heart, can protect the credibility of your elections by discouraging voters from casting multiple ballots. Online voting systems also reduce waste and make it easier for individuals to participate, which is one of the key goals of voting systems.

Electronic voting, online e-voting, and online election systems are other names for an online voting system. All of these systems speak to the same thing: a safe voting process that enables organizations to solicit feedback from their members and instantly assess the results. To learn more about the advantages of voting online, including how long it takes, keep reading.

Advantages of Online Voting

You may be surprised to learn that TV contests receive more votes than some political elections. This is due to the fact that American political elections require people to physically travel to polling places and cast their ballots. Electronic voting machines are used in TV reality competitions to enable viewers to cast their votes online from the comfort of their homes. The television industry can serve as an example for those who are unsure of how to encourage people to vote in online contests.

Online voting gives voters more freedom and convenience, which is its main advantage. Every person with access to a computer or smartphone that has internet connectivity can cast a ballot in a matter of seconds with only a few clicks. Due to the nearly universal availability of computers, smartphones, and internet connectivity in the United States, casting a ballot online is now significantly quicker and simpler.

Voter participation can be increased by enabling voters to avoid the usual voting barriers with a secure and high-quality online voting system. Additionally, electronic voting gives voters with disabilities—particularly those who have sight or hearing impairments—more privacy than traditional voting. Online voting can also inspire non-voters to participate in elections and appeal to younger voters. By lowering the possibility of ballot errors, it can also raise the standard of elections.

What Function Do Online Voting Systems Serve?

By gathering your group's feedback in a timely, organized, and verified manner, online voting systems can assist you in making crucial decisions. Whether these be yearly selections or continual surveys, these approaches offer advantages in both cases.

Using an electronic voting system is essential to:

  • Your choice of leaders: Multiple positions on a board of directors may be up for election, including chair, vice president, treasurer, and secretary; each of these positions may call for supporting documentation, resumes, biographies, and headshots.
  • Accept new members into your group: Online voting systems make it easier to maintain a fair evaluation process and inform candidates of what to expect.
  • Obtain anonymous feedback from your team: Managers and supervisors are interested in learning how their staff members feel about their duties and working environment. Electronic voting systems allow for secret balloting, which encourages staff to express their opinions because they know their opinions won't be used against them.
  • Elections for yearly budgets: Online voting will maintain your elections accessible and secure, regardless of where your employees may be, because it's vital to change your organization's budget.
  • Change your operating policies and procedures: People can react negatively to change, just like they do during elections. Online voting platforms enable you to get your group's opinion as soon as feasible. As a result, you'll need to collect individual feedback on these adjustments in a methodical manner.

In each of these situations, voting online enables you to quickly obtain input, make smarter choices, and demonstrate that your choices adhered to the rules and processes established by your business.

How to Shop on TikTok


TikTok was without a doubt the most downloaded social media app in the first quarter of 2022.

Though it began as a music-focused app that encouraged users to sing along to their favorite songs, the platform already has over 1 billion active users, and there is now a wide variety of material featuring more original videos from users.

In 2022, it will be common for brands to use video in particular to interact with their communities and display their personality.

Brands may communicate with their customers more through social media apps like TikTok, which boosts both brand awareness and customer loyalty.

Why therefore wouldn't TikTok shopping be the next is a simple question.

But First: The TikTok Phenomenon

The defunct social networking app "Vine," which was removed from the app store in 2016, is comparable to an updated version of TikTok.

Users of Vine might upload seven-second videos, with content resembling some of the TikTok videos now being submitted.

Studies have shown that Gen Z and millennials have attention spans of roughly 8 and 12 seconds, respectively, therefore the popularity of short video clips made sense.

ByteDance, a tech business, recognized a window of opportunity and seized it to launch TikTok.

The "For You" page, which promotes videos that are most likely to match your interests and grab your attention, is the first item you are taken to when you start the app.

In contrast, the posts on other social media platforms like Facebook and Instagram come mostly from the brands and people you follow.

The algorithm behind TikTok is made to keep users browsing and interested by showing them new posts from random users.

You can see how this success leads to the next stage of the social platform: TikTok purchasing. The "For You" tab may be TikTok's most successful feature on the app because it creates material for each user's particular interests every second.

What Is TikTok Shopping?

TikTok commerce makes it simple for users to buy the goods they see on the app without ever leaving it (very similar to Instagram Shopping, which you can learn more about here).

TikTok facilitates the e-commerce industry for shops by highlighting goods and services that customers may buy directly from the platform.

TikTok shopping is useful since it allows users to take advantage of the items that influencers are currently promoting on the app and skip the step of visiting the product's website.

On TikTok, a lot of firms use influencers in their marketing campaigns by providing their goods to users who have large followings and asking them to spread the word about them.

The majority of the time, influencers are paid to push favorable feedback on whatever the firm wants them to promote. Occasionally, reviews are unpaid and sincere.

It's easy for people to buy products:

  • They see a product they like and then search for the brand's TikTok page (or find some while browsing the app!) Businesses that promote their items on TikTok will get a dedicated shopping page on their profile.
  • The buyer can then look through the many products available by the company and select the specific goods they desire.
  • When they are through shopping, TikTok users can purchase the things directly from the app, or it will instantly redirect you to the company's website to complete your purchase.

Below is an example from Kylie Cosmetics, one of the first brands to adopt TikTok shopping, that shows both the link to the TikTok shop and what occurs when you click on the link.

Again, the interface is identical to Instagram, making it a simple transition for marketers looking to reach a new audience, as well as consumers who use both platforms:


Screenshot from TikTok, June 2022

How To Setup Your Own TikTok Shopping Experience

If you're in the United States and you're reading this, it's likely because you can't seem to locate any information on how to begin anyplace.

This is due to TikTok shopping not having been launched in the United States yet (Kylie Cosmetics was, unsurprisingly, part of a trial).

Although some sites claim that this function is available to everyone in the United States, it will actually be implemented over the coming months.

When the time comes, we'll post an update here and help you through the setup!

Currently, if you Google "TikTok Seller Central," you'll be directed to this page, where you can see the seven Asian regions and the one in the United Kingdom that offers TikTok shopping.


Screenshot from TikTok, June 2022

TikTok Shopping Best Practices

Start monitoring the companies and accounts you follow in the interim; the bigger names will probably open their stores first.

So that you are prepared to go when the time comes for your firm, keep an eye on their films and strategies.

What we suggest is as follows:

1. Post Authentic Content That Shows Your Sense Of Humor

Posting brief videos of actual consumers using your product and assembling them into a montage will not only appear more genuine, but will also motivate users to interact with your business.

2. Take Advantage Of Existing Trends And Audios

The brands who take advantage of participating in popular trends—whether it's a popular dance or song that is trending throughout the world on TikTok—are the successful ones.

3. Collaborate With Influencers

Working together with other influencers will help your brand become more well-known and bring in new clients.

Teens trust influencers more than traditional celebrities by a margin of 70%, therefore when they promote your products, the influencers have a significant influence on the decisions made by their audience.

4. Give Users Full-screen Focus (Vertical Video)

Unlike other social media apps like Youtube and Twitter, where you can turn your phone sideways and the content still fits on the screen, TikTok's software is designed to display only vertical videos.

It's critical to post videos on TikTok that allow users full-screen focus if you want to keep your videos looking tidy and professional to viewers.

17 Relaxing Music Videos for Calming Down Your Classroom


During study breaks, playing some soothing music might help everyone relax and refuel so we're ready to take on the rest of the day.

1. Happy Background Music for Children

Calming music to give developing minds a much-needed breather

2. Happy Relaxing Music for Children

After a difficult morning, this upbeat hang-drum song is the ideal remedy

3. Relaxing Guitar Music

Let this guitar's strumming soothe your anxieties!

4. Instrumental Background Music for the Classroom

This is a good collection of instrumental classroom background music.

5. Relaxing Music for Stress Relief

Your worries will be washed away by the undersea sounds

6. Calming Music for Children in the Classroom

Make a good atmosphere for learning so that people may write, read, study, or do their assignments.

7. Fine Art Music and Paintings

Set to a slide display of gorgeous paintings, the music of Debussy and others

8. Relaxing Music & Ocean Waves 

Busy minds can benefit greatly from the rhythmic and relaxing sounds of the ocean

9. Happy Relaxing Guitar Music for Children

This video's lovely plucking has such an uplifting, revitalizing feeling

10. Relaxing Nature Sounds

Enjoy the sounds of birds tweeting and water rushing

11. Minecraft Soundtrack

This musical soundtrack is excellent for a breather between courses even if your pupils don't like Minecraft

12. Instrumental Music to Relax

Guitar and keyboard are used in this soothing video

13. Morning Relaxing Music For Children

A excellent option for calming music in the classroom in the middle of the morning

14. Positive Background Music for Kids

The perfect video for a well-deserved rest or even for studying is really motivating and pleasant. 

15. Classical Music for Kids in the Classroom

The "Four Seasons, Concerto No. 4 in F minor" by Vivaldi is performed on the violin in this clip.

16. 3 Minute Timer with Music for Kids!

Time management can be aided by watching this tenacious three-minute timer video. To listen to classical music, visit this site. Attempt the one-minute, five-minute, and twenty-minute timers as well.

17. Relaxing Music for Children with Animals

Perfect for encouraging serenity and mindfulness as well as a love of nature and the environment.

How to Add Music to PowerPoint


The kind of slideshow you're making in Microsoft PowerPoint may or may not benefit from the use of music. You can wish to use a lively exuberant music on a slide or a delicate, understated melody all through the presentation.

We'll go over a few alternative methods for adding music to PowerPoint before demonstrating how to use a single song on a slide or play background music continuously.

Upload a song from your computer

Uploading a song from your PC is most likely the simplest approach to include music in your presentation. This song may be one from your playlist or one you've saved and frequently listen to.

Step 1: Open your PowerPoint presentation and select a slide to add the music.

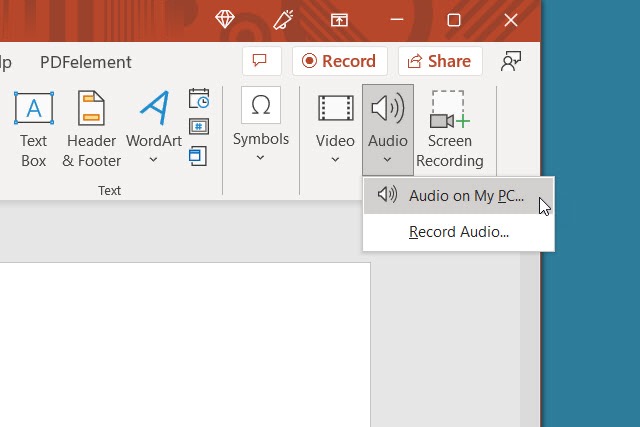
Step 2: Go to the Insert tab and choose the drop-down arrow for Audio on the right side of the ribbon.

Step 3: Pick Audio on my PC, browse for the music file, and select Insert.

Audio on My PC in the Audio drop-down box in PowerPoint.

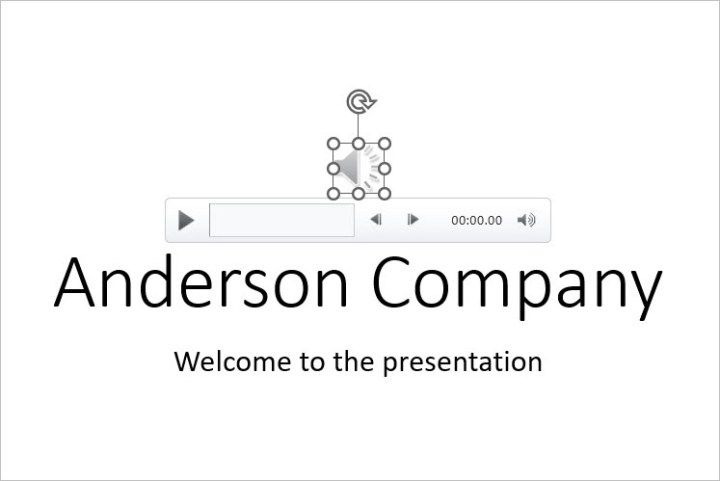
Step 4: You’ll then see an audio icon on your slide for the song.

Audio icon on a slide.

Step 5: Use the Play button to listen and the Playback tab to adjust the playback options.

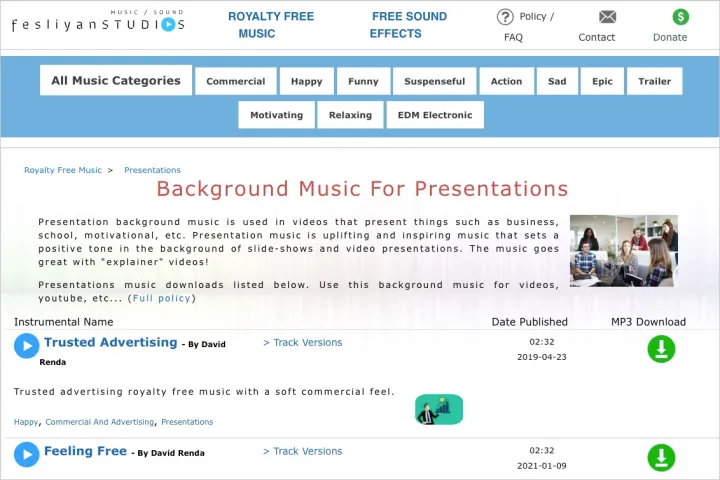
Fesliyan Studios Inc. main page.

Download free music

Perhaps you already know the kind of song you desire, but your computer doesn't contain a copy of it. There are a few web sources where you may get free tracks with no royalties for presentations.

Fesliyan Studios Inc.: Choose a genre at the top such as commercial, happy, sad, or relaxing. Press the Play button to listen, then check out alternate versions where available. Choose Download to get the song.

Chosic: You’ll see a slew of songs for presentations from upbeat to soft. When you hear the song you want, select Download > Free Download.

SoundCloud: If you’re already a SoundCloud listener, this is a good option for presentation music. Type “free downloads” or similar into the search box and review the results. When you find the song you want, select More or the three dots to download the tune.

There are a few ways to download MP3s from YouTube if you can also discover free music there.

Once you've downloaded a music from this list, store it to your device and then upload it to the slideshow as previously mentioned.

Record music while creating the slideshow

You can record a song right in PowerPoint if you're fortunate enough to be musically talented. Make your own presentation music by warming up your voice chords or picking up a guitar.

Step 1: Open your PowerPoint presentation and select a slide to record the music.

Step 2: Go to the Insert tab and choose the drop-down arrow for Audio on the right side of the ribbon.

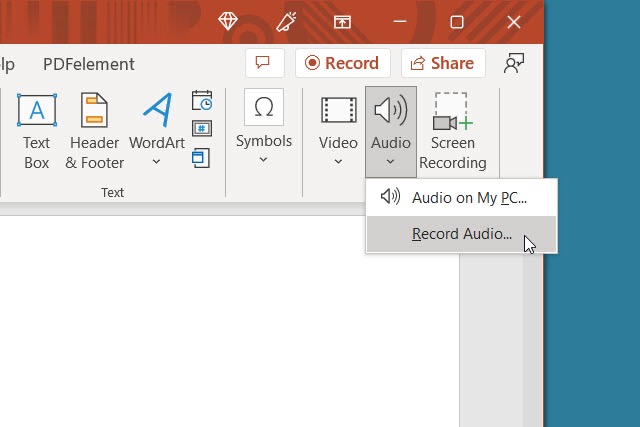
Step 3: Pick Record audio. Note: You must have either a built-in or external microphone for your computer.

Record Audio in the Audio drop-down box in PowerPoint.

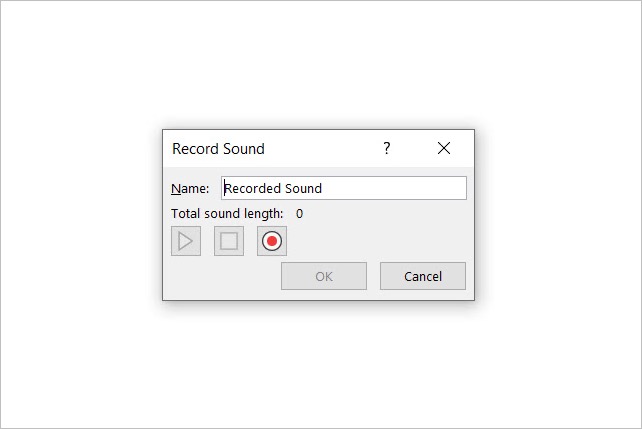
Step 4: When the Record Sound box appears, select the red, round Record button to start recording.

Audio recording dialog box in PowerPoint.

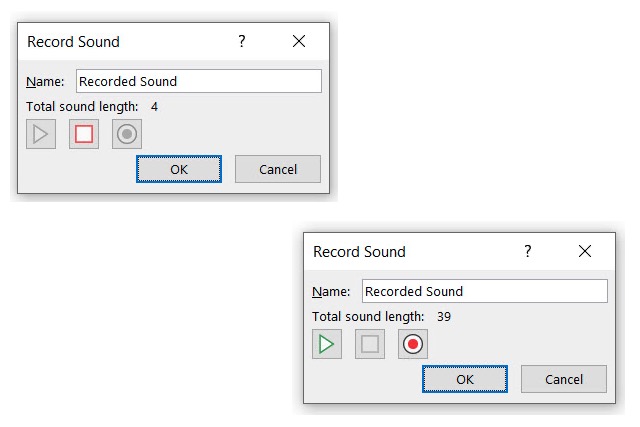
Step 5: Press the square Stop button when you finish. To listen to the recording, press the green Play button.

Stop and Play buttons for recorded audio.

Step 6: When you finish, select OK to insert it onto the slide.

Recorded audio on a slide in PowerPoint.

Step 7: You’ll then see the audio icon just like with an inserted audio file. Press the Play button to hear the recording.

Add an offscreen video

Sometimes a video is associated with the perfect song for the circumstance. There is a workaround to include that song in your show even though you can't currently just play the audio and you definitely don't want the video as part of your presentation.

Step 1: Open your PowerPoint presentation and select a slide to add the video.

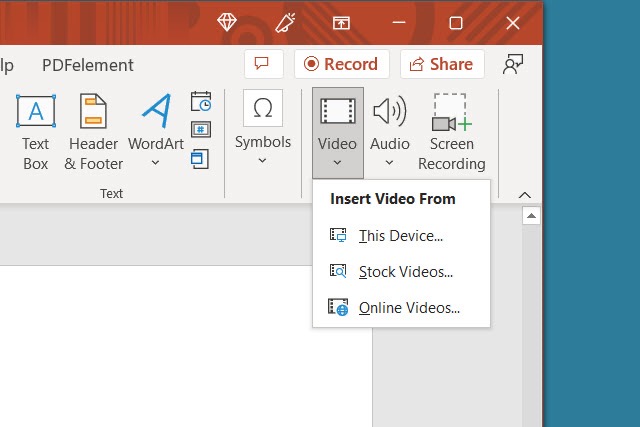
Step 2: Go to the Insert tab and choose the drop-down arrow for Video on the right side of the ribbon.

Step 3: Pick This DeviceStock Videos, or Online Videos and follow the prompts to insert the video.

Options in the Video drop-down box in PowerPoint.

Step 4: When the video appears on the slide, drag a corner or edge to make it smaller and then drag it off of the slide to one of the sides.

With this, you can play the video to hear the audio only—you won't be able to view it in your slideshow.

Video resized and moved off the slide.

Step 5: Select the video and use the Playback tab to adjust the options for playing it when clicking the slide or automatically.

Play the song or use as background music

Once you've added the music to PowerPoint, you can decide whether it should play continuously during the presentation or only on one slide.

Step 1: Go to the slide containing the music and select it.

Note: Depending on your preference, you'll probably want the file on the first or second slide if you want the music to play continuously throughout the slideshow.

Step 2: Head to the Playback tab and choose to play the song with the slide or as background music.

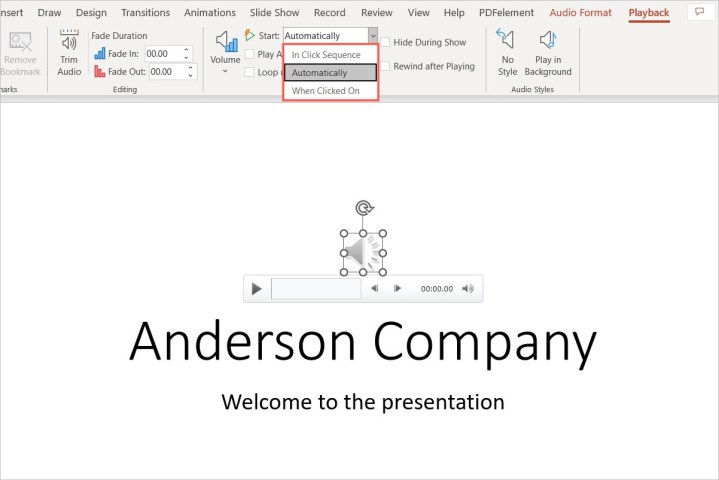
Step 3: To play the song only on that slide, choose the Start drop-down box in the Audio options section of the ribbon and pick how you want the music to begin. You can select In click sequenceAutomatically, or When clicked on. When you advance to the next slide, the song stops playing.

Start actions to play a song on a slide.

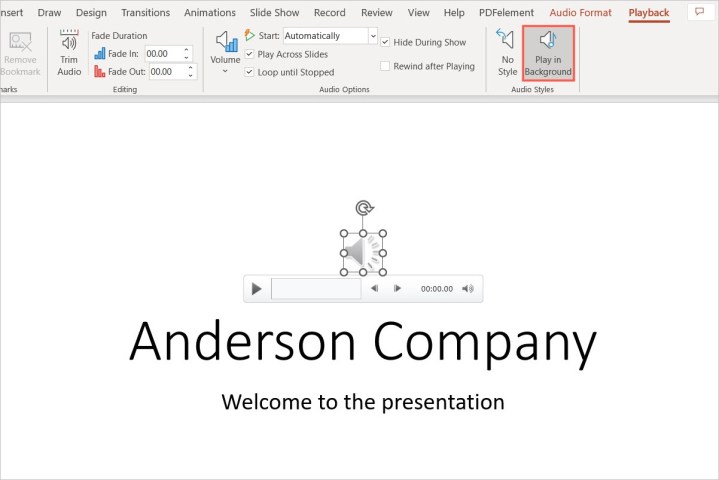
Step 4: To play the song throughout the presentation, select Play in background in the Audio styles section. This automatically checks the boxes for Play across slides and Loop until stopped. You can also choose an option in the Start drop-down box for how to begin playing the song.

Remember that the method mentioned before, which uses video files, does not apply here; only audio files do.

Play in Background button in the PowerPoint ribbon.

Step 5: Adjust any other options on the Playback tab per your preference. You can increase or decrease the volume, rewind the song after it plays, or add a fade in or out effect.

After you've included the music, don't forget to practice your presentation to make sure it sounds the way you want it to. You can also think about including closed captions for hard of hearing people.

Free How-To Tutorials

Search This Blog

Menu Halaman Statis