Showing posts with label Blogging. Show all posts

The Ultimate Guide to Writing a Successful Blog Post


Blogging has become an essential part of the online community. It is a way for people to express their thoughts and opinions on a specific topic, share knowledge, and build a community. However, with millions of blogs out there, it can be tough to stand out. To write a successful blog post, you need to have a solid strategy in place. In this ultimate guide, we will share tips and tricks on how to write a blog post that will engage your readers and keep them coming back for more.

1. Choose a topic

The first step in writing a successful blog post is choosing a topic. Your topic should be relevant to your audience, and you should have some expertise or interest in the subject. One way to choose a topic is to look for trending topics in your niche or industry. You can also ask your readers or social media followers for topic ideas.

2. Do your research

Once you have a topic, it's time to do your research. Look for credible sources, such as academic journals, government websites, or industry publications. You can also use Google Scholar or other search engines to find research papers or studies related to your topic. Make sure to take notes and organize your research for easy reference.

3. Create an outline

Before you start writing, create an outline of your blog post. An outline helps you organize your thoughts and ensures that your post has a clear structure. Your outline should include a title, introduction, main points, and conclusion. You can also add subheadings and bullet points to break up the text and make it easier to read.

4. Write a compelling headline

Your headline is the first thing readers will see, and it can make or break your post. A compelling headline should grab your readers' attention and entice them to read further. Use power words, numbers, and emotions to make your headline stand out. Make sure your headline is also SEO-friendly by including relevant keywords.

5. Write an engaging introduction

Your introduction should hook your readers and keep them interested. Start with a question, a surprising fact, or a personal anecdote. Make sure your introduction is relevant to your topic and provides a clear thesis statement. Your thesis statement should explain what your post is about and what your readers can expect to learn.

6. Use subheadings and bullet points

Using subheadings and bullet points makes your post easier to read and understand. Subheadings break up your text into smaller sections and provide a roadmap for your readers. Bullet points are a great way to highlight important information or lists. Use bold or italicized text to emphasize key points or quotes.

7. Write in a conversational tone

Writing in a conversational tone makes your post more engaging and relatable. Use simple and concise language, avoid jargon or technical terms, and write as if you're having a conversation with your readers.

8. Add visuals

Add visuals such as images, videos, infographics, or charts to make your post more visually appealing and informative. Visuals also break up the text and make your post easier to skim. Make sure your visuals are relevant to your topic and of high quality.

9. Edit and proofread

Once you've finished writing, take a break and come back to your post later with fresh eyes. Edit your post for clarity, consistency, and accuracy. Check for grammar and spelling errors, and make sure your post flows well. You can also use tools such as Grammarly or Hemingway to help you with editing and proofreading.

10. Promote your post

Finally, promote your post on social media, email newsletters, or other channels. Share your post with your followers and encourage them to share it with their networks. You can also reach out to other bloggers or websites in your niche and ask them to share your post. The more exposure your post gets, the more traffic and engagement it will receive.

Conclusion

Writing a successful blog post takes time, effort, and strategy. By following these tips and tricks, you can write a blog post that engages your readers, provides value, and drives traffic to your website. Remember to choose a relevant topic, do your research, create an outline, write a compelling headline and introduction, use subheadings and bullet points, write in a conversational tone, add visuals, edit and proofread, and promote your post. With these steps, you can become a successful blogger and build a loyal following.

References:

Disclaimer: The images used in this article are for illustration purposes only. The sources of the images are from Bing search results and do not belong to the author.

How to Shop on TikTok


TikTok was without a doubt the most downloaded social media app in the first quarter of 2022.

Though it began as a music-focused app that encouraged users to sing along to their favorite songs, the platform already has over 1 billion active users, and there is now a wide variety of material featuring more original videos from users.

In 2022, it will be common for brands to use video in particular to interact with their communities and display their personality.

Brands may communicate with their customers more through social media apps like TikTok, which boosts both brand awareness and customer loyalty.

Why therefore wouldn't TikTok shopping be the next is a simple question.

But First: The TikTok Phenomenon

The defunct social networking app "Vine," which was removed from the app store in 2016, is comparable to an updated version of TikTok.

Users of Vine might upload seven-second videos, with content resembling some of the TikTok videos now being submitted.

Studies have shown that Gen Z and millennials have attention spans of roughly 8 and 12 seconds, respectively, therefore the popularity of short video clips made sense.

ByteDance, a tech business, recognized a window of opportunity and seized it to launch TikTok.

The "For You" page, which promotes videos that are most likely to match your interests and grab your attention, is the first item you are taken to when you start the app.

In contrast, the posts on other social media platforms like Facebook and Instagram come mostly from the brands and people you follow.

The algorithm behind TikTok is made to keep users browsing and interested by showing them new posts from random users.

You can see how this success leads to the next stage of the social platform: TikTok purchasing. The "For You" tab may be TikTok's most successful feature on the app because it creates material for each user's particular interests every second.

What Is TikTok Shopping?

TikTok commerce makes it simple for users to buy the goods they see on the app without ever leaving it (very similar to Instagram Shopping, which you can learn more about here).

TikTok facilitates the e-commerce industry for shops by highlighting goods and services that customers may buy directly from the platform.

TikTok shopping is useful since it allows users to take advantage of the items that influencers are currently promoting on the app and skip the step of visiting the product's website.

On TikTok, a lot of firms use influencers in their marketing campaigns by providing their goods to users who have large followings and asking them to spread the word about them.

The majority of the time, influencers are paid to push favorable feedback on whatever the firm wants them to promote. Occasionally, reviews are unpaid and sincere.

It's easy for people to buy products:

  • They see a product they like and then search for the brand's TikTok page (or find some while browsing the app!) Businesses that promote their items on TikTok will get a dedicated shopping page on their profile.
  • The buyer can then look through the many products available by the company and select the specific goods they desire.
  • When they are through shopping, TikTok users can purchase the things directly from the app, or it will instantly redirect you to the company's website to complete your purchase.

Below is an example from Kylie Cosmetics, one of the first brands to adopt TikTok shopping, that shows both the link to the TikTok shop and what occurs when you click on the link.

Again, the interface is identical to Instagram, making it a simple transition for marketers looking to reach a new audience, as well as consumers who use both platforms:


Screenshot from TikTok, June 2022

How To Setup Your Own TikTok Shopping Experience

If you're in the United States and you're reading this, it's likely because you can't seem to locate any information on how to begin anyplace.

This is due to TikTok shopping not having been launched in the United States yet (Kylie Cosmetics was, unsurprisingly, part of a trial).

Although some sites claim that this function is available to everyone in the United States, it will actually be implemented over the coming months.

When the time comes, we'll post an update here and help you through the setup!

Currently, if you Google "TikTok Seller Central," you'll be directed to this page, where you can see the seven Asian regions and the one in the United Kingdom that offers TikTok shopping.


Screenshot from TikTok, June 2022

TikTok Shopping Best Practices

Start monitoring the companies and accounts you follow in the interim; the bigger names will probably open their stores first.

So that you are prepared to go when the time comes for your firm, keep an eye on their films and strategies.

What we suggest is as follows:

1. Post Authentic Content That Shows Your Sense Of Humor

Posting brief videos of actual consumers using your product and assembling them into a montage will not only appear more genuine, but will also motivate users to interact with your business.

2. Take Advantage Of Existing Trends And Audios

The brands who take advantage of participating in popular trends—whether it's a popular dance or song that is trending throughout the world on TikTok—are the successful ones.

3. Collaborate With Influencers

Working together with other influencers will help your brand become more well-known and bring in new clients.

Teens trust influencers more than traditional celebrities by a margin of 70%, therefore when they promote your products, the influencers have a significant influence on the decisions made by their audience.

4. Give Users Full-screen Focus (Vertical Video)

Unlike other social media apps like Youtube and Twitter, where you can turn your phone sideways and the content still fits on the screen, TikTok's software is designed to display only vertical videos.

It's critical to post videos on TikTok that allow users full-screen focus if you want to keep your videos looking tidy and professional to viewers.

How to Shop Online: Five Easy Steps to Start Shopping Online


Online shopping is advantageous for several factors. Online shopping not only makes it easy to buy what you need when you need it from the comfort of your home, but it also lets you instantly compare prices, look for deals, or read reviews. Additionally, you can have your purchases delivered right to your door.

However, it can be too much! How do you identify trustworthy websites? What about storing your credit card information? Are you sure it's that safe? And would opening an account to make a purchase online be worthwhile, or will it only fill your inbox with tons of spam?

We've put together a helpful guide on how to begin shopping online to assist you in safely navigating the infinite aisles of online retail.


Step 1 – Finding the right website and product

Sometimes the hardest thing is not knowing where to begin. The simplest method is to enter the store or item you're looking for directly into your search field. The best results should then appear, and you may click through to them.

As an alternative, many search engines also include a useful "shopping" option that provides direct links to online shops that have the item you're looking for. You can occasionally view their customer service ratings in addition to their rates when conducting a search.

Top tip: Check the security of the websites you select to use for online purchasing. If you buy from more reputable companies, you can probably trust that their website is safer. Additionally, we advise looking for a "padlock" emblem in the search box and a website address that begins with HTTPS (the "S" denotes "secure"). Additionally, make sure the website's name doesn't include any weird characters or spelling mistakes.


Step 2 – Adding a product to your basket

You've put in the effort and discovered what you were looking for. You can choose your number, color, or size from here before adding the item to your basket. Occasionally, buying more than one thing or subscribing to a service can lower your delivery charges. If you anticipate using these things frequently, it's worthwhile to look into it.

Top tip: Many websites provide "wish list" or "list" functions that let you save products for later if you like something but aren't ready to make the purchase.


Step 3 – Completing your purchase at checkout

You can move on to "checkout" after adding the item to your basket. You might need to create an account using your email address depending on the website. This is helpful for routine purchases like groceries because you can save your card and address information for a quicker checkout the next time you make an online purchase. The website will now walk you through the payment procedures.

Top tip: Some stores provide one-click payments, which you may use to shop online without having to repeatedly enter your card information by setting it up and proving that you are the cardholder.


Step 4 – Pay it safe

You must input your card number, expiration date, and CCV (card verification value), which is typically printed on the back of your card and typically consists of three numbers, when paying at the checkout of an online store for the first time. Your bank may require you to provide your mailing address or merely the postcode as an additional means of confirming that you are the one making the purchase.

When using your card to make a purchase, you might have to go through an additional security checkpoint. By using two-factor authentication, your bank may confirm that the correct cardholder is making a purchase by requesting an additional piece of information. You won't need to register, download any software, or install anything; everything will be explained to you along the way.

Online payments ought to feel secure and safe. The majority of websites let you pay with debit and credit cards like your Visa. Visa and your banks work hard to ensure the security of your payments and employ several security measures to thwart fraud, safeguard your data, and assist you in getting your money back if your card is used fraudulently.

Top tip: Regularly checking your account and being aware of recent transactions are both wise decisions. You may even sign up for alerts anytime a payment has been made on your account with some mobile banking apps. In this method, you might be able to use Visa's "zero liability" guarantee to get your money back if you notice a fraudulent payment.


Step 5 – Taking delivery

Some retailers allow you to schedule a delivery time slot, while others notify you through email or text when your order has been shipped. Although it's difficult for delivery services to guarantee your arrival at a specific time, many of them now offer a window of time or the option to track your purchase, allowing you to organize your day accordingly. Whenever possible, attempt to select a time when someone will be home to receive the package.

Top tip: Check out the store's return policy before you pay. If you're unhappy with a purchase, many internet retailers will allow you to return it, and some even provide free shipping. Furthermore, you can typically cancel an online order within a specific time frame thanks to UK distance selling restrictions.

How to Change the Wallpaper on Your Android Smartphone


While you might not be aware of it, the Android smartphone's wallpaper is the most frequently seen image. Therefore, it makes sense to be fussy and change it when you grow tired of the existing one, when you find something more intriguing, or if you simply want it to suit your current mood. Did you know that there are multiple ways to customize the wallpaper on your Android phone's lock screen and home screen? This tutorial demonstrates three distinct ways to change the wallpaper on Android smartphones and tablets.

What You Should Know About Android Smartphone Wallpapers

Your Android smartphone by default includes a selection of pictures and wallpapers, some of which can be extremely lovely. They also have the benefit of exactly fitting your screen. No matter how much you like them, you can only have so many, therefore eventually you will grow tired of them.

Fortunately, you have a few options for updating the wallpaper on your Android smartphone: you may select from your own photographs, download interesting wallpapers, or sync them from your Windows 10 device using Bluetooth or a USB cord.

You can utilize one of two wallpaper types on your Android smartphone:

  • Regular wallpapers include still graphics and photos. Consider the fact that the majority of Android smartphones have high-resolution screens when choosing a wallpaper picture.
  • Live wallpapers are animated and occasionally interactive because they respond to your input. You may tweak some of the characteristics of some live wallpapers by using their own settings. A specialized app or shop for themes and wallpapers may be available for your phone, and you may get live wallpapers from the Play Store.

Although this article concentrates on still wallpapers, you may use the same steps to set a Live wallpaper that you've already downloaded.

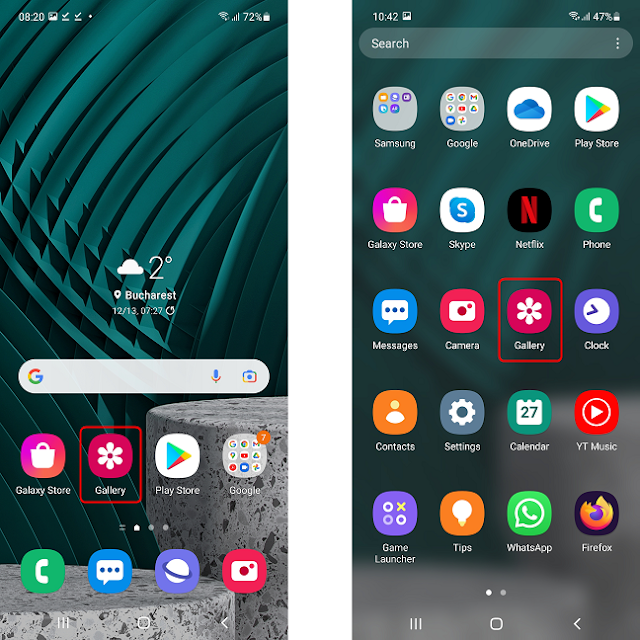
1. From the Home screen, modify your Android's background image

The Home screen of your smartphone is the easiest and quickest place to change your Android wallpaper. Depending on the device and Android version, the procedure differs a little. Starting with Android 11, please.

How to alter your Android 11 wallpaper from the Home screen

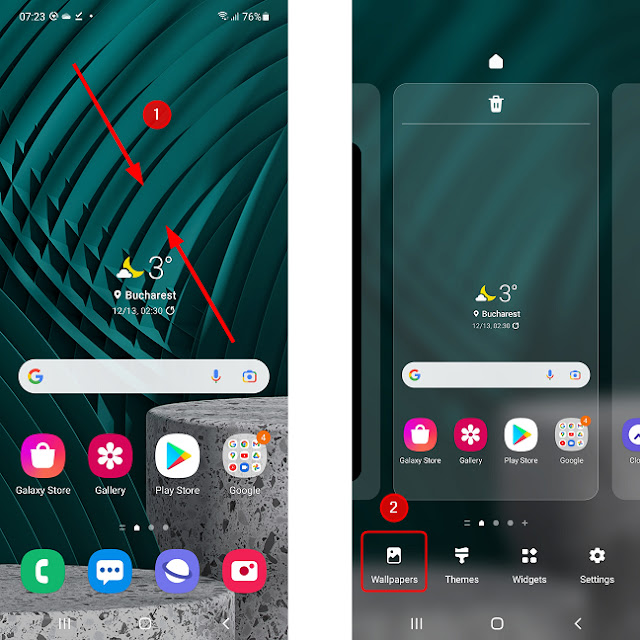
Android 11 requires you to either pinch the screen or tap and hold until the screen changes, depending on your smartphone. Both actions on Samsung Galaxy devices will provide the same outcome. Tap on Wallpapers now.

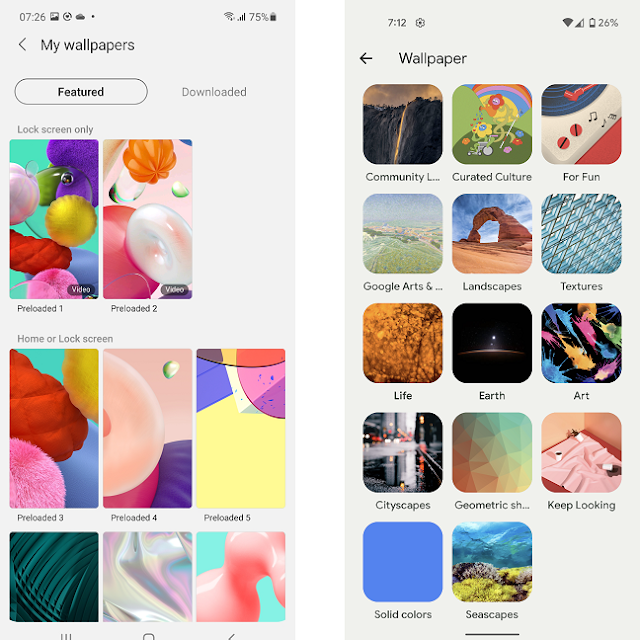
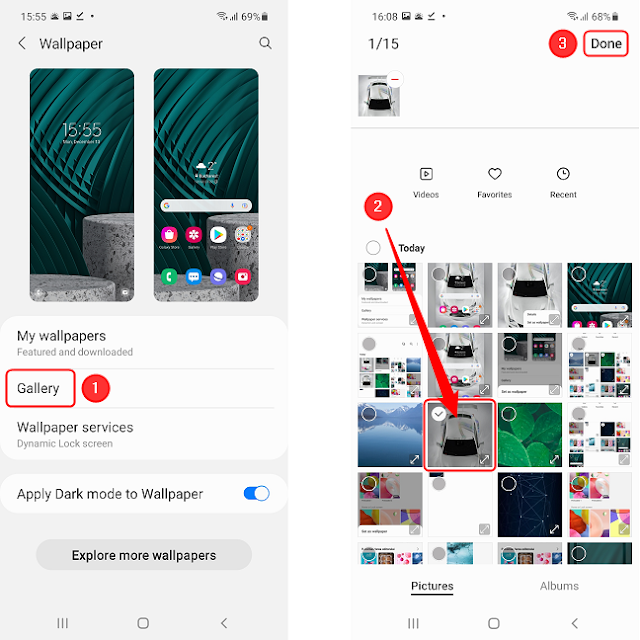
You then have three choices. By tapping on Explore more wallpapers, you can access the Galaxy Themes shop, browse the Gallery, or select from the pre-installed wallpapers on the device (My wallpapers).

NOTE: You must sign in with your Samsung ID in order to download wallpaper from the Galaxy Themes store. You may find your newly downloaded or purchased wallpaper in the My wallpapers area under Downloaded after visiting the store and doing so.

Let's imagine that you used your browser to get a wallpaper from the internet. In this instance, or if you took the photo yourself, tap on the picture that should be in the Gallery section. Next, decide the wallpaper you'd like to use for your Lock screen or Home screen. You can only choose numerous images as your lock screen wallpaper if you choose multiple images (the phone will alternate between them). When you've decided on the ideal wallpaper, tap Done in the top right corner of the screen.

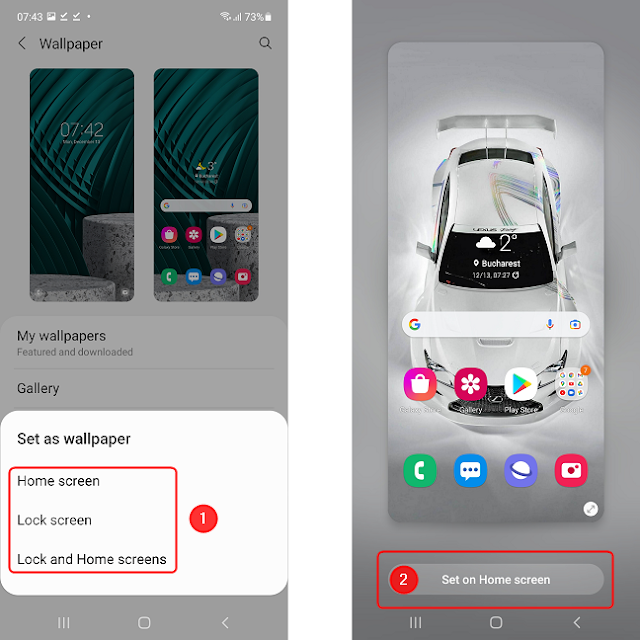
All that's left to do is choose one of the three possibilities based on whether you want the image to appear on the Home screen, the Lock screen, or both. A preview is shown to you after choosing one of the choices. Tap the button in the bottom-right corner of the screen to confirm. I'm done now!

How to alter your Android 12 wallpaper from the Home screen

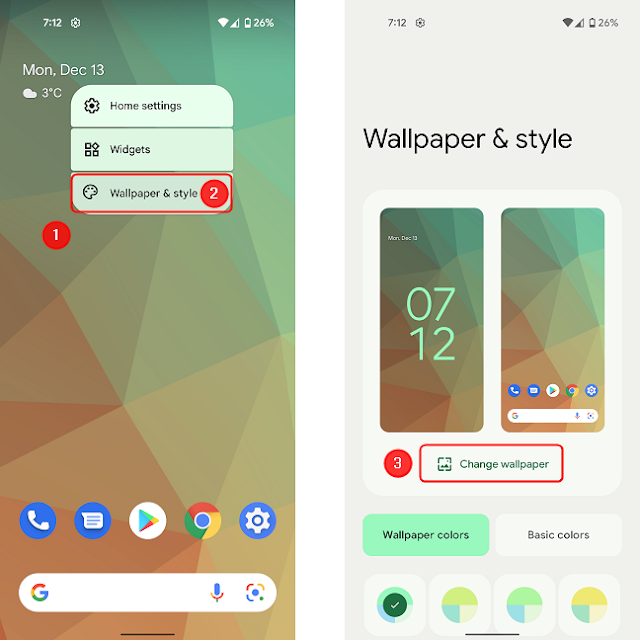
The process is little different in Android 12. On the Home screen, start by tapping and holding a blank area until a menu appears. Choose the wallpaper and style. Then select Change wallpaper.

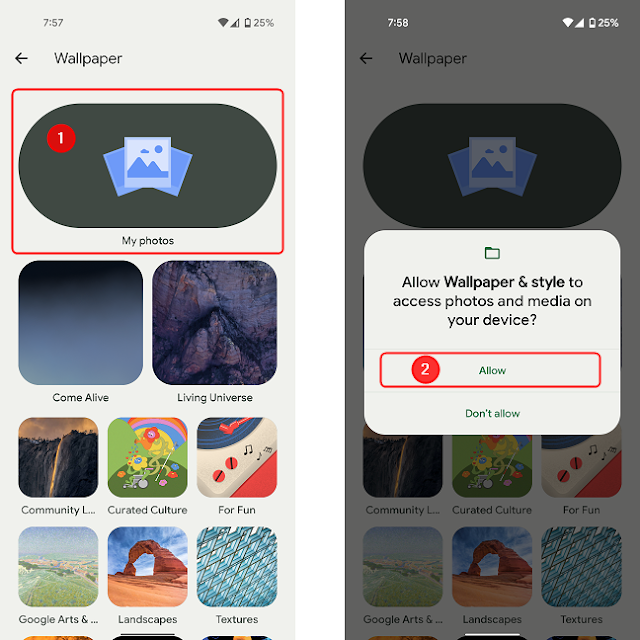
The variety is just enormous, at least on Google Pixel smartphones, but if you're looking for a specific wallpaper and have previously downloaded it, you should be able to find it under the My photos section. Tap Allow if the phone asks for your consent to allow the Wallpaper & style app access to your device's files.

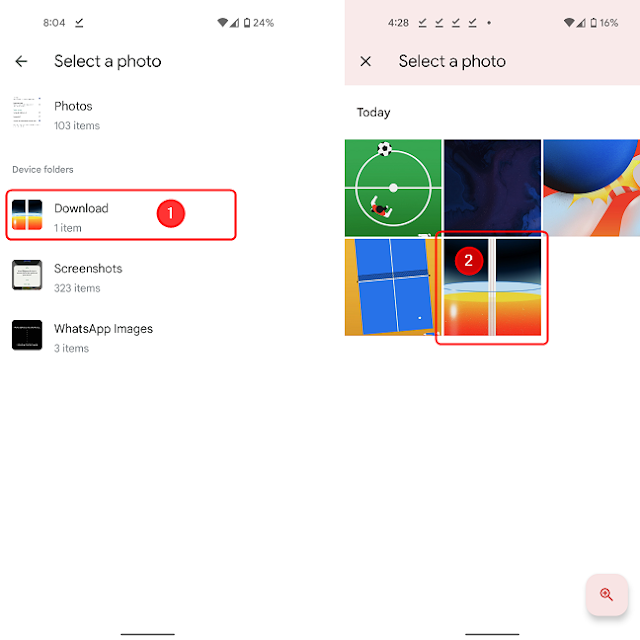
Go to the Photos folder if you wish to use a photo that you took, or the Downloaded folder if you downloaded the wallpaper. Click the image.

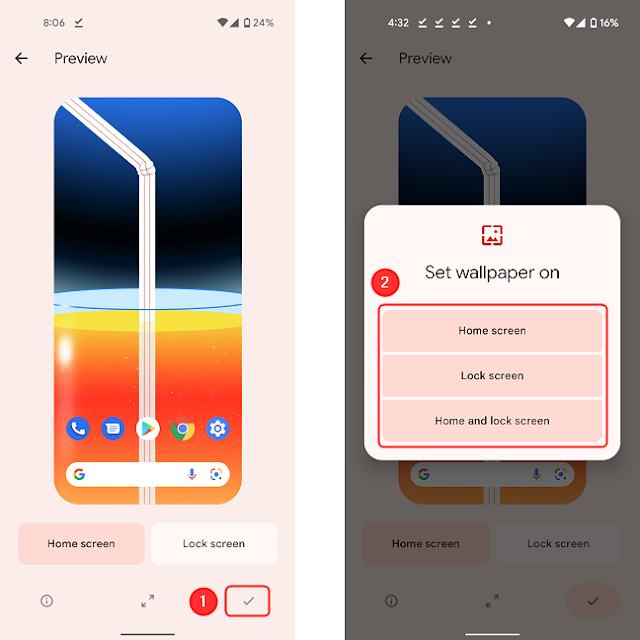
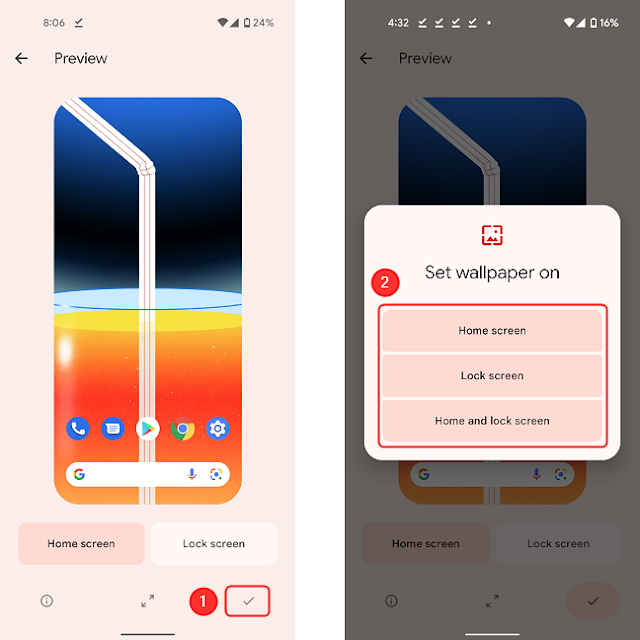
Tap either of the two options to see a preview and decide if you want to use it as a Home screen or a lock screen wallpaper. After you hit the checkmark, you will be taken to the following screen, where you will actually make your choice. When you choose the desired option, the wallpaper is displayed.

By selecting the Back button or swiping horizontally from either side of the screen, you can now close the application.

2. From the Gallery or Photos app, alter your wallpaper

If you're unsure about what you want, you can browse and choose an image from your smartphone's gallery to use as your background. One smartphone model to another has a different gallery app name and process, therefore let's start by examining the Samsung Galaxy running Android 11.

How to change your wallpaper on a Samsung Galaxy mobile from the gallery

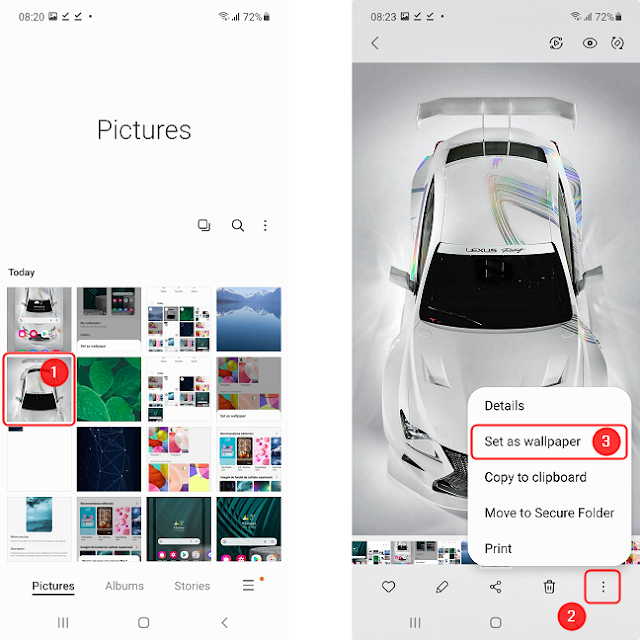
The photo gallery on Samsung devices (as well as many other smartphones) is simply referred to as Gallery. Either locate and press on its shortcut on the Home screen or tap on it on the All apps screen to access it.

Once you've located the ideal wallpaper in the photo collection, tap it. Next, select Set as wallpaper by tapping the symbol with the three dots in the lower-right corner of the screen.

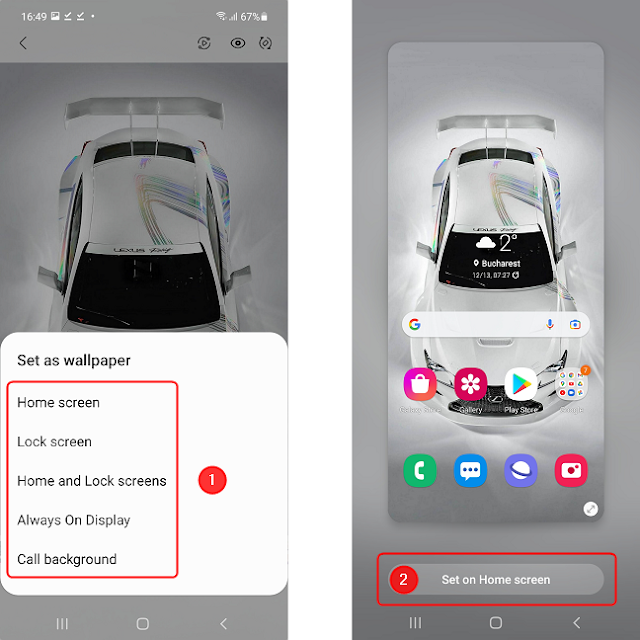
Choose the desired choice from the menu. The image can be used as a backdrop for the always-on display or as a call background. To confirm the action, tap on the button in the lower-right corner of the screen. The wallpaper is set after a short while.

How to modify your wallpaper in the Android Photos app

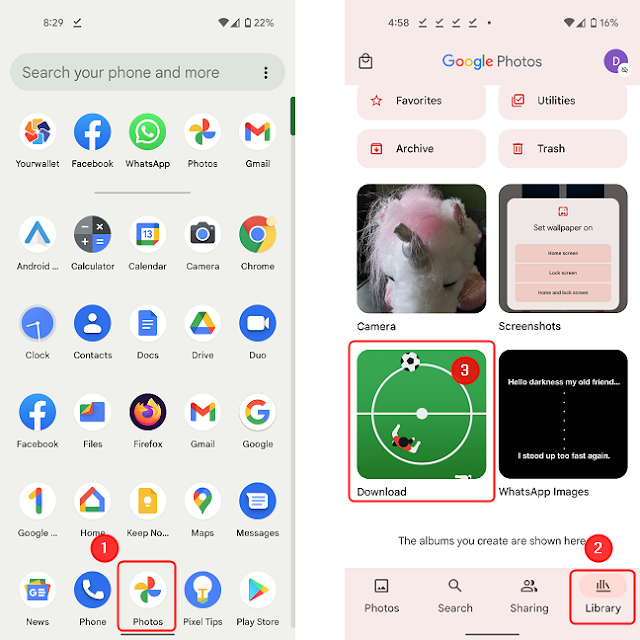
Photos, a Google app, is used to manage the images on Pixel phones. Swipe up to reveal the app drawer, then press on the app's icon to launch it. Then, tap Library, which is located in the bottom right corner of the screen. If you got the wallpaper from another source, you can now select Download, or if you took the photo, select Camera.

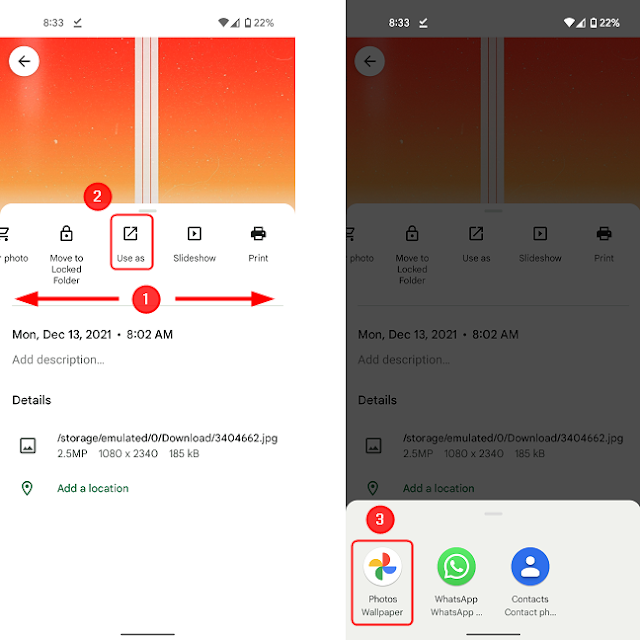
Look through the images, then tap the one you want to enlarge. Next, click the three-dot button located in the screen's upper right corner.


Select Use as after navigating the menu selections to the right and left. You will see a variety of alternatives for the following step, depending on the apps on your device. Tap on Photos wallpaper to change the Home screen or Lock screen background.

Tap the checkbox after viewing the screen. Select the option that best suits your needs from the menu. The image will be set as wallpaper in a short while.

3. Modify your background image using the Settings app

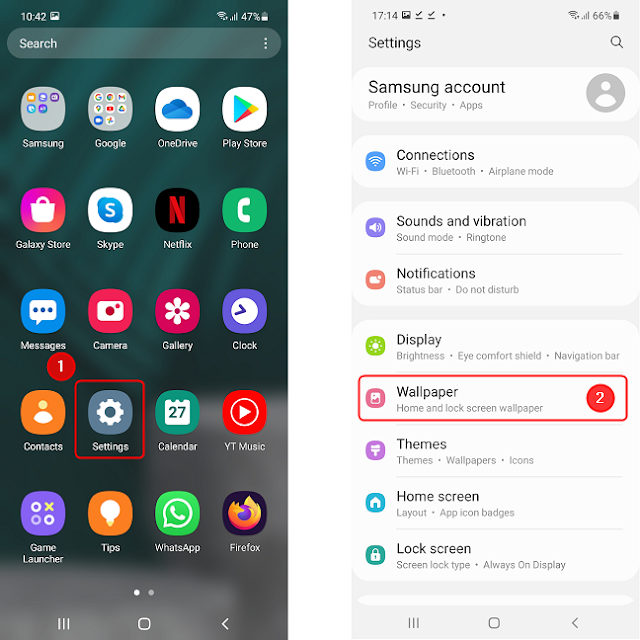
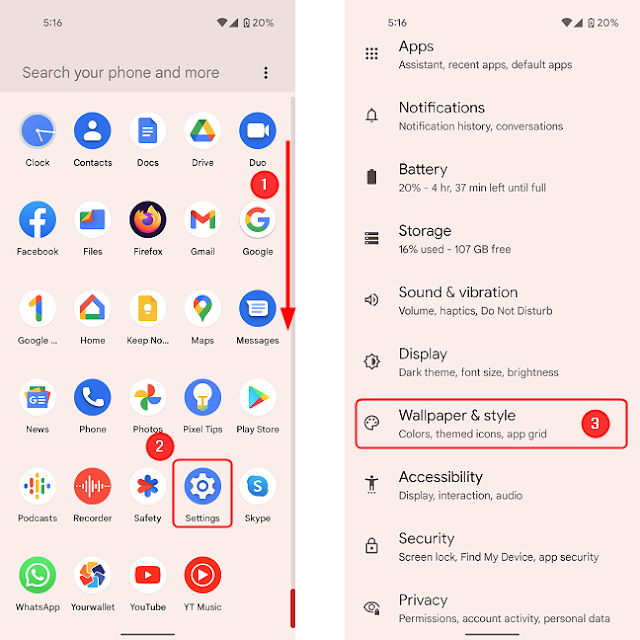
Open Android Settings to change your wallpaper as well. One way to accomplish so is to tap Settings after opening the All apps screen. On Android 11-powered Samsung Galaxy handsets, select Wallpaper from the settings menu. Following the steps outlined above will result in the exact same screen being displayed as in method one.

The same Wallpaper & style app that we mentioned in the first way is also available on the Pixel 4a running Android 12 in the Settings menu. Simply tap it, then carry out the previous instructions.

How Much do Etsy Shops Actually Cost to Start Up and Maintain?


Etsy is one of the first possibilities for selling things online that individuals learn about when it comes to beginning a small business, especially if the business is centered around the handmade industry. Many entrepreneurs begin their journeys on this platform, and many of them continue to operate their businesses even after they have gained some notoriety and have their own separate website. That precisely describes my situation: Even though I now make the majority of my sales through my own website, I still maintain a presence on Etsy because that is where most of my new customers first discover me. I started my graphic design business eight years ago. It's also very affordable compared to other e-commerce options, which is another reason I appreciate it and will definitely keep my shop there for many years to come. But how much does it really cost to start and maintain an Etsy store? Is it really worth it to start your business this way? Let's investigate!

What is the price to start an Etsy store?

You would need to think about that first, right? Well, starting an Etsy account is completely free. You got that right. Once you begin listing and selling things, all you need to do is register an account and link a debit or credit card to pay for transaction costs. For the simple act of having your shop open, there is neither an upfront investment nor a required monthly payment. You may, however, upgrade your account by purchasing an Etsy Plus subscription, which would give you access to additional services like sophisticated store customization options and advertising credits.

What is the cost of uploading a product?

Etsy will charge you $0.20 each time you add a new product to your store. This item will remain on the market for 4 months or until it sells. If the product hasn't sold after those four months, you can renew the listing for an additional $0.20. Let's imagine that before establishing your store, you have 25 things ready. Your initial collection upload will cost you $5.00.

How much will it cost me to sell a product?

They fall into two categories:

- The real transaction fee: 6.5% of the item price, including delivery, will be deducted from your payment.

- Payment processing costs: these vary based on the nation where your bank is located. Depending on the nation, they range from 3% to 4% plus roughly $0.25 each sale, including shipping.

Transaction and payment processing fees will be directly deducted from any funds you haven't yet sent to your bank and placed to your Etsy payment account. You can choose to pay your Etsy bill anytime you like each month if you have no money in your account.

So how much does it cost to maintain an Etsy store monthly? a few illustrations

Let's use two distinct scenarios to illustrate it. Let's assume that these stores are based in the United States for the purposes of these instances, and we won't factor in shipping costs (you will typically alter them so they don't cost you).

- In the first, we are discussing a tiny store with 30 items, which averages 10 sales per month at an item average price of $35.00. This might apply to jewelry designers who manage their business in their spare time. The recurring charges would be:

  • You have 30 products to renew three times a year, and you need to add new ones (because each listing last for 4 months). That equals 7.5 renewals on average each month. After every sale, we also need to include the cost of renewing or uploading new things. The additional renewals would be 10. Obviously, depending on how many new things you add to your shop each month, these two amounts could overlap in various ways. As an example, let's use 17.5 monthly renewals. There would be a $3.50 cost overall.
  • With 10 sales at an average price of $35, your shop would earn $350.00 a month thanks to Etsy transaction fees. Your charge would be increased by $22.75 to cover transaction costs.
  • Processing charges for payments: 3% of $350.00 plus $0.25 per transaction. There would be a $13.00 cost overall.

You would have earned $316.00 in total after paying $39.25 toward your Etsy payment.

- As a second illustration, consider a much larger store with 125 items, an average of 40 monthly sales, and a $60.00 average item price. We might be discussing an antique store. The recurring charges would be:

  • Renewing/adding new products: Using the same reasoning as in the preceding scenario, there would be 40 renewals per month for adding a new item after each sale and 31.25 renewals per month for things that had expired. There would be about $14.25 in listing fees.
  • Etsy transaction fees: the store would generate $2400 per month, making the cost $156.
  • Processing charges would be calculated as follows: 3% of $2400 plus $0.25 per sale. There would be a $82.00 cost overall.

After paying $252.25 for the Etsy bill and PayPal fees, our final profit would be $2183.75.

There are more ways to spend money on Etsy, but they are entirely optional. For example, you can advertise your products using Etsy Advertising or build an independent website with Pattern. Remember that you only have to pay the very ridiculous renewal/adding new listings fees if you don't sell a single item in the month, which is definitely the case if you're just starting out.

These figures, in my opinion, are a good way to comprehend the value of this platform, even if you are unaware of other tools to compare it with. I don't want to start talking about other e-commerce possibilities because that would make this essay unending. For me, Etsy is a fantastic platform for people with a passion to grow it in their free time or for small company owners to showcase their goods to the world. The major justifications for attempting it, in my opinion, are the inexpensive costs and the possibility to instantly interact with a huge number of consumers worldwide.

The Difference Between Weather And Climate


Climate is the average daily weather over a lengthy period of time in a specific location, as opposed to weather, which represents short-term atmospheric conditions.

the mouth of the Russian River

A storm darkens the sky at the mouth of the Russian River, north of Bodega Bay, Calif. Weather can change from minute-to-minute, hour-to-hour, day-to-day, and season-to-season. Climate, is the average of weather over time and space.

We frequently hear about the weather and climate. To arrange our days, the majority of us consult the local weather prediction. Furthermore, climate change is unquestionably a "hot" news topic. The differences between the two continue to cause a lot of confusion.

Consider it like this: Climate is what you anticipate, weather is what you experience.

What you see outside on any given day is the weather. So, for instance, it may be 20 degrees with heavy snow or it could be 75 degrees and sunny. That is the climate.

The average of the weather is the climate. As an illustration, you can anticipate snow in the Northeast in January or hot and muggy weather in the Southeast in July. Climate is this. Extreme values, such as record-breaking high temperatures or heavy rainfall, are also part of the climatic record. Climate records are what your local weather person means when she says, "Today we hit a record high for this day."

Therefore, when we discuss climate change, we are referring to changes in long-term daily weather averages. The weather can vary from minute to minute, hour to hour, day to day, and season to season in most regions. The average of the weather through time and space, however, is the climate.

How to Recover Photos On iPhone Without Backup


Nobody wants to experience the frustrating circumstance of losing images on an iPhone. When it does, there is one thing you should keep in mind: while the photos are not truly lost but rather wait to be overwritten, you should use that iPhone as little as possible or turn it off in order to enhance your chances of retrieving them directly from the device without backup files. Any action that writes to the space, such as adding new images to an iPhone, will permanently wipe any previously deleted photos.

In other words, it's recommended for you to cease using the iPhone right once if you can't locate and recover the photographs from the "Recently Deleted" album in the Photos app. It would be dangerous to carry out the restoration method on iPhone unless you are certain that the images were included within an iCloud backup before deletion.

Recovering iPhone Photos Without Backup Files

Apple primarily offers two offline and online options for data backup and restoration, including photo backup and restoration using iTunes or iCloud. However, if you are now reading this post, it is likely that your search for a way to recover your iPhone's images without a backup file has come up empty. Fortunately, there's still a significant chance that those photographs can be recovered with the iOS Data Recovery third-party file recovery app.

It is essentially a reliable solution for retrieving images and other iPhone information without the need for backup files. It is built with a sophisticated scanning engine that can perform a comprehensive scan of the iPhone's memory and display the files you can recover. Additionally, it offers preview and search features, enabling you to individually or in bulk recover files.

The next tutorial covers the detailed directions for restoring images on iPhone without making backup files earlier. Let's start to see how it gets the job done.

Guide: How to Recover Photos from iPhone without Backup File

Step 1: Connect iPhone to computer

The startup interface will show up once you have installed and launched the application on your computer.

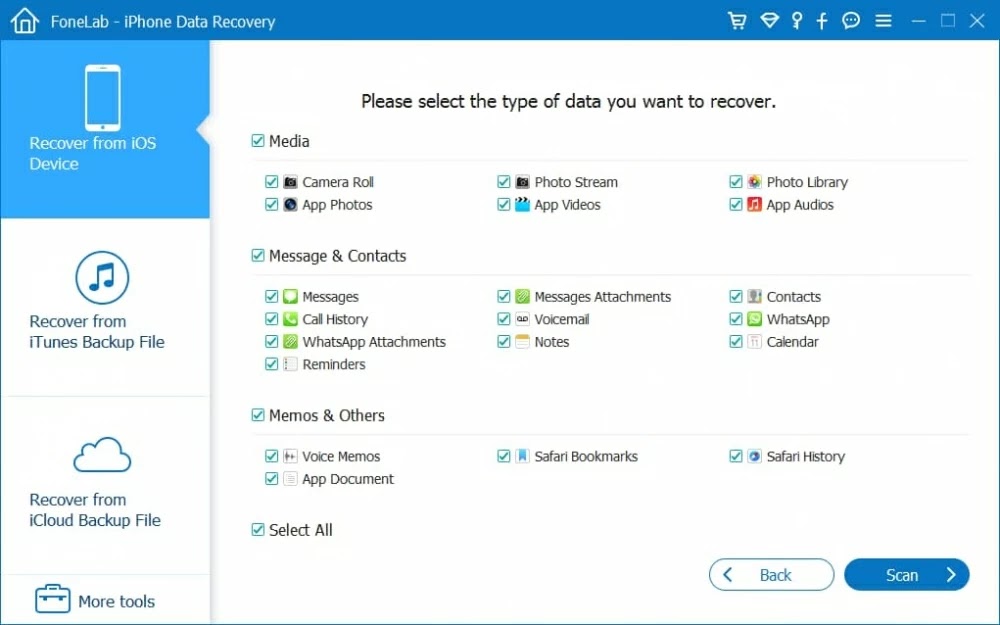
You can only restore lost images from your iPhone's memory if it has no backups. To accomplish this, select "Recover from iOS Device" mode from the menu on the interface's left. Next, get a USB cord and connect your iPhone to the computer using it.


After that is complete, the program will automatically search for your connected iPhone and display its image, name, and current generation on the right pane.

Step 2: Scan the iPhone memory for deleted photos

Choose the data type you want to scan for and recover at this point. In this case, select "Camera Roll," "Photo Stream," and "Photo Library" before clicking the lower-right Scan button to start a deep scan of your iPhone.

Simply wait while the app searches the memory of your iPhone for items; you can see the scan's progress in the display.

When the scan completes, the application offers up an intuitive summary of all sorts of files. Additionally, the numerous categories displayed on the left side help you find the precise files quickly.

Step 3: Choose the deleted photos for recovery

It's time to decide what you want to restore at this point. When you're ready to recover iPhone photos, click here "Camera Roll" category (or "Photo Library", "Photo Stream", "App Photos" category) under "Media" section from the left pane, then look at the repaired photographs on the right pane.

You can flip the "Only display the deleted items (s)" option to ON at the right pane's top if you simply want to look at and recover deleted photos. 

Step 4: Start retrieving photos straight from iPhone without backup file

Once your photos have been chosen, click the Recover button in the lower right corner to bring up a pop-up box where you may choose where to save the recovered photos. On your computer, you can select a different path or just utilize the default output folder.


On order to start the process of recovering your iPhone images, press the Recover button in the pop-up box. Depending on how many photographs you've chosen, this can take some time.

After that, check the photographs by opening the destination folder on your computer.

Restoring Photos from iCloud Backup

It is possible and simple to restore images to your iPhone from an iCloud backup if you have an iPhone backup.

  • Tap on Settings > General > Reset > Erase All Contents and Settings.
  • When you get to the "Apps and Data" screen, tap Restore from iCloud Backup.
  • Enter your Apple ID and password.
  • Select the backup you want to restore photos from.

The process of restoring your images from an iCloud backup should take some time.


Retrieving Pictures from an iTunes Backup

You can connect your iPhone to iTunes and use it to restore images from a backup if you decide to back up your iPhone using iTunes and keep the backups on your computer.

  • Connect your iPhone to your computer and launch iTunes.
  • Click on the device icon when it displays in the iTunes window.
  • Go to Summary tab and select Restore Backup...
  • Select a backup from a list of archives available, click Restore.


Conclusion

Using iOS Data Recovery, you may learn a lot more about restoring images on an iPhone without backup data. The program is generally easy to use and walks you through a successful recovery process. Remember that every Apple customer should backup their iPhone data to prevent data loss.

How to Establish Credit at The Age of 18


Building credit when you're 18 is crucial to becoming an adult. These seven pointers will show you how to begin establishing credit at the age of 18.

1. Recognize the fundamentals of credit.

You should have a fundamental understanding of how credit works before moving forward.

The three primary credit reporting agencies, Experian®, Equifax®, and TransUnion®, keep track of your credit record. Separate reports may be produced by each bureau. Your credit score is determined by the information in the report. VantageScore 3.0®, a credit score model offered by Chase Credit Journey, and FICO® are used to calculate this.

Your VantageScore 3.0® credit score is primarily determined by these six factors:

  • Payment history 
  • Credit history 
  • Credit usage 
  • Total balances 
  • Recent credit 
  • Available credit

Your FICO® credit score is primarily determined by five criteria, including:

  • Payment history 
  • Credit utilization 
  • Length of credit history 
  • New credit 
  • Credit mix

All of the aforementioned can have an impact on your credit score depending on your future conduct.

Your free credit report must be provided to you by the three main credit reporting bureaus once a year. Your interest rate on credit cards and loans will be determined by future lenders using your credit report and score. If you have a high score, your interest rate will probably be lower; if you have a low score, your interest rate will probably be higher.

2. Obtain authorization to use

Do you know somebody who is prepared to add you as an authorized user and has a good credit rating? A person who has permission to use another person's credit card is known as an authorized user. You can begin to establish credit activity by doing this.

Even if your card is inactive, provided it is in good standing, its activities may raise your credit score. Both of you may suffer if you or the principal cardholder accrue excessive debt.

Make sure the credit card firm records activities for authorized users before signing up as one. You won't be able to build credit otherwise.

3. Get a beginner credit card.

Using credit cards is an excellent way to establish credit. You can have problems being approved for some cards if you don't have a credit history. Consider a student credit card if you're a student.

With a secured credit card, you can also build your credit history. A security deposit or piece of property is necessary for a secured credit card. The cash deposit, which is normally between $200 and $500, becomes your credit limit. Chase does not provide secured credit cards, but they function similarly to regular credit cards. They may have exorbitant interest rates, annual fees, and incur late fees when payments are missed.

4. Establish credit by making timely payments.

Making on-time payments is one of the best things you can do to improve credit because payment history is a crucial component of your credit score.

Making prompt payments affects more than just your credit card balance. To build good credit, you should pay all of your obligations on time, including student loans, vehicle loans, and other debts. Your credit score may suffer as a result of missed or late payments.

Enrolling in autopay is one approach to ensure that you never forget to make a payment.

5. Maintain a low balance.

Your credit usage ratio is a crucial component of your credit score. A percentage of your credit score is determined by your credit utilization ratio, or how much debt you have relative to your credit limit.

Keep your credit utilization ratio around 30%, according to experts. In general, you should aim to keep that percentage significantly lower, about 10%.

The best course of action is to pay off your balance in full each month. By doing this, you'll keep your usage low and save money on interest.

6. Loan money to students

It can be advantageous to take out a loan only for credit-building purposes. Even if Chase doesn't offer student loans, you can require this kind of loan to support your college expenses.

Your credit report will reflect all student loan debt, including federal, private, and refinancing obligations. As soon as you start making payments on a loan, it will start to affect your credit score.

7. Pay attention to your credit report and score.

Make sure everything is in order before you begin to establish credit. Chase Credit Journey offers free access to your credit score. Verify that there are no errors. Inform the major credit reporting bureaus of any errors you find.

Free How-To Tutorials

Search This Blog

Menu Halaman Statis