Showing posts with label Appliances. Show all posts

Installing a Ceiling Fan Remote: A Complete Guide


install ceiling fan remote

Introduction

Adding a remote control to your ceiling fan can greatly enhance its convenience and functionality. With a ceiling fan remote, you can easily adjust the fan speed, control the lighting, and even set a timer without leaving your seat. If you're looking to install a ceiling fan remote in your home, this comprehensive guide will walk you through the process step by step.

Gather the Necessary Tools

Before you begin the installation process, make sure you have the following tools handy:

  • Screwdriver (both flathead and Phillips)
  • Wire cutters
  • Wire strippers
  • Electrical tape
  • Voltage tester

Turn off the Power

Safety should always be your top priority when working with electrical components. Start by turning off the power to the ceiling fan at the circuit breaker. Use a voltage tester to ensure that the power is indeed off before proceeding.

Access the Ceiling Fan Wiring

Remove the ceiling fan canopy cover to gain access to the wiring. The canopy cover is typically held in place by screws. Carefully unscrew them and set the cover aside.

Identify the Wiring Connections

Once the wiring is exposed, you'll find several connections. The most common connections are:

  • Power supply wires (usually black and white)
  • Fan wires (typically black, white, and blue)
  • Light wires (often black and white)

It's essential to identify these wires correctly to ensure a successful installation.

Remove the Existing Wall Switch

If your ceiling fan is currently operated by a wall switch, you'll need to remove it to install the remote control. Start by turning off the power to the switch at the circuit breaker. Then, unscrew the switch cover and disconnect the wires from the switch. Insulate the loose ends of the wires with electrical tape to prevent any accidents.

Disconnect the Existing Ceiling Fan Receiver

If your ceiling fan has an existing receiver, it needs to be disconnected before installing the remote control. Locate the receiver, which is usually housed in the canopy or attached to the mounting bracket. Disconnect the wiring connections from the receiver, carefully noting which wires are connected to each terminal.

Prepare the Remote Control Receiver

Before installing the remote control receiver, ensure that the power to the ceiling fan is still switched off. Connect the wiring from the remote control receiver to the corresponding wires from the ceiling fan. Use wire nuts to secure the connections and cover them with electrical tape for added safety.

Mount the Remote Control Receiver

After connecting the wiring, mount the remote control receiver in a suitable location. It should be securely attached to a stable surface using the provided screws. Ensure that the receiver is positioned in a way that allows the remote control's signal to reach it without obstruction.

Attach the Antenna

Many ceiling fan remotes come with an antenna for enhanced signal reception. Attach the antenna to the receiver according to the manufacturer's instructions. This will typically involve screwing it into a designated port on the receiver.

Reassemble the Ceiling Fan

Now that the remote control receiver is installed, it's time to reassemble the ceiling fan. Start by reattaching the canopy cover using the screws you removed earlier. Make sure the cover is securely fastened to the ceiling.

Pair the Remote Control

Once the fan is reassembled, it's time to pair the remote control with the receiver. Follow the instructions provided with your specific remote control model to complete this process. Typically, it involves pressing a combination of buttons on the remote control and the receiver to establish a connection.

Testing and Troubleshooting

After pairing the remote control, turn the power back on at the circuit breaker. Test the remote control's functions to ensure they are working correctly. If you encounter any issues, double-check the wiring connections and consult the troubleshooting section of the remote control's manual.

Conclusion

Installing a ceiling fan remote can bring added convenience and control to your living space. By following this step-by-step guide, you can successfully install a remote control for your ceiling fan. Remember to prioritize safety, double-check your wiring connections, and refer to the manufacturer's instructions for specific details related to your remote control model. Enjoy the comfort and ease of adjusting your ceiling fan with just the press of a button!

How Much does It Cost to Remodel a Small Kitchen?


A kitchen remodeling job can be rather challenging, especially if your kitchen is on the smaller side (70 square feet or fewer). However, a kitchen with restricted proportions is still capable of serving as the operational hub of your home in an effective and satisfactory manner. Having said that, if you are thinking of remodeling it, you will likely need to keep some considerations in mind. There are a lot of people who are interested in finding out what the typical cost is to renovate a small kitchen.

Renovating one's kitchen is very popular and highly desired among homeowners. Remodeling your kitchen in a way that is both functional and aesthetically pleasing can significantly raise the market value of your home.

You should be aware that redesigning a tiny kitchen might be somewhat more difficult than the majority of individuals anticipating it will be. Because of the smaller amount of space available, you may be under the assumption that the cost to redesign a small kitchen is less than that of a bigger kitchen.

Be mindful, though, that every inch of square footage in a cramped kitchen counts as valuable real estate. As a result, it could be difficult to figure out how to attain the ideal combination of design and utility in a kitchen that is on the smaller side.

In this article, we will provide you with an idea that is fairly true on the typical cost of remodeling a small kitchen. In addition to this, we will offer some guidance to assist you in optimizing the use of the funds allocated for the renovation of your kitchen.

How Much Does It Typically Cost To Renovate A Small Kitchen?

The pricing range for a small kitchen remodel is from $9,500 to $14,250 on average. You should budget something in the range of $25,000 to $35,000, or perhaps more, if you want an expensive makeover for a small kitchen. It encompasses the expense of replacing kitchen countertops, sinks, cabinets, certain appliances, flooring, lighting, kitchen backsplashes, and a great deal more.

You need not fret; you will not be required to implement all of these changes at the same time. In point of fact, if all you decide to do is make aesthetic changes, you won't have to spend more than a few thousand dollars at most on the project. These include things like giving the room a new coat of paint, putting in low-cost new flooring, and putting in a new sink with a new faucet.

The price of renovating a small kitchen is heavily influenced by quite a few different aspects to a large degree. The size of your kitchen, the kind of materials you choose to purchase, and whether or not you intend to change the layout of your kitchen are the three aspects that are most significant among these considerations. The following is a breakdown, expressed in percentages, of how much of your budget will be consumed by each component of the kitchen remodel:

  • Cabinetry and hardware – 29%
  • Professional installation procedures – 17%
  • Ventilation and appliances – 14%
  • Kitchen countertops – 10%
  • Flooring – 7%
  • Lighting – 5%
  • Walls and ceilings – 5%
  • Doors and windows – 4%
  • Faucets and plumbing – 4%
  • Design fees – 4%
  • Other miscellaneous costs – 1%

Price of Cabinetry for the Kitchen

One of the most important aspects of any kitchen makeover is the selection of cabinets for the kitchen. If they are out of date, you need to make sure to purchase new ones as soon as possible. They are also known to be one of the components that contribute the most to the overall cost of a modest kitchen renovation. It is important to keep in mind that the prices of kitchen cabinets can range widely on the market. As a consequence of this, they can be found in a wide variety of styles, qualities, and durability levels.

It will typically cost you between $4 and $10 per square foot to refinish your cabinets by giving them a new coat of paint and giving them a new veneer. Alternately, the cost of simply replacing their doors, also known as refacing them, will range between $8 and $25 per square foot.

There will be a price difference of around $120-380 per linear foot for ready-made stock cabinets with widths ranging from 6 inches to 42 inches, with increments of 3 inches. Be sure that you are paying close attention to the unit that is being utilized here. This is one of the more cost-effective choices you have when it comes to purchasing brand new cabinets for your home.

Cabinets that are semi-custom or fully customized are two other possibilities that are comparable to these. The cost of semi-customized cabinets ranges from from $145 to $950 per square foot. These cabinets' drawers and door fronts can be adjusted for an additional fee.

On the other hand, custom cabinets are made to order and created exclusively for the renovation of your kitchen. As a consequence of this, they are typically quite pricey. If you are interested in purchasing them, the pricing per linear foot will range from approximately $500 to $1,425 dollars.

Keep in mind that when it comes to choosing between Chinese and American cabinets, we strongly suggest that you go with the latter option. In general, American cabinets are more long-lasting than their Chinese counterparts; in addition, they do not include any potentially dangerous substances, such as formaldehyde, and they have longer warranty periods. As a result, you will end up saving a significant amount of money by using them.

Kitchen Countertops

The countertops in your kitchen are second only to the cabinets in terms of their importance to the overall appearance and usefulness of your kitchen. As a result, they have the ability to contribute a significant amount to the expense of remodeling a tiny kitchen.

Quartz and granite are two examples of the classic materials that are frequently selected by customers when purchasing countertops. On the other hand, countertops on the market now are composed of a wide variety of novel synthetic materials such as paper-glass, concrete, Silestone, Avonite, and WilsonArt, amongst many others.

The heat resistance, ease of maintenance, and sturdiness of the countertop are all dependent on the material that it is built of. Naturally, the prices also change in accordance with this.

Materials such as bamboo, laminate, and tile, for instance, will only set you back anywhere from $3 (in the case of bamboo) to $35–40 (in the cases of laminate and bamboo) per square foot. They are very simple to maintain and clean, however they are quite vulnerable to being scratched or burned.

Solid surface countertops, on the other hand, would run you approximately $52.12 per square foot and are susceptible to stains as well as high temperatures. On the other hand, they are not easily scratched and are friendly to the environment. To ensure that you are making an educated purchase, you need to first consider all of these benefits and drawbacks.

Kitchen Flooring

People have a tendency to consider installing new flooring an essential component of the process of remodeling the kitchen. Laminates, hardwoods, tile, and natural stone are the types of flooring that are used the most frequently in kitchens.

When getting new kitchen flooring laid, most homeowners should expect to pay anywhere between $8 and $15 per square foot on average. If you have a modest kitchen that is only 70 square feet in size, you should expect to pay somewhere between $720 and $1050. When deciding on a flooring material for your kitchen, you need to give careful consideration to the many functions and requirements of the space.

It is important to point out that you should lay the flooring material beneath your kitchen cabinets when you are doing the installation. In order to save money, miserly homeowners and dishonest contractors will often try to get away with not replacing the flooring that is located under the cabinets. This frequently results in the collection of moisture, which in turn leads to serious rots and damages over time.

If you want to avoid spending several thousand dollars to correct that, you need to make sure that you give this the attention it deserves before you start remodeling your kitchen.

You can transform your cramped kitchen into a room that is not only extremely practical but also aesthetically beautiful by employing the services of the proper contractor and planning everything out from the very beginning.

The Top Storage and Organization Trends of 2023


The industry of home organization is constantly undergoing change, and as a result, there is no shortage of innovative items or effective methods available today. Systems that allow homeowners to save time and money while also adapting to the ebbs and flows of their lifestyles are becoming increasingly important to homeowners. Since the year 2020, the importance of our homes has increased significantly, and the rise in the number of organizing businesses, as well as the abundance of TikTok organizing tips that flood my "For You" tab, surely represent this shift.

During my conversation with other experienced organizers, we discussed the themes they believe would be prevalent in the year 2023. And although some of these trends may not come as much of a surprise, such as a focus on developing better work-from-home arrangements and environmentally friendly items, others may cause you to rethink your organizing plans for the coming year.

1. Sustainability Is the Overarching Priority

It's not exactly groundbreaking to become more eco-conscious and structured at the same time. In 2022, there was a rise in the number of storage goods that were manufactured from recycled or environmentally friendly materials. Brandie Larsen and Ryan Eiesland, the cofounders of Home+Sort, predict that this trend will become even more widespread in the coming year. According to Larsen, "2023 is going to be the year for sustainable organization." "People are embracing the options that are environmentally friendly but get the job done by making their lives easier in any room in their home," said one researcher. "People are loving the solutions that are ecologically friendly but get the job done."

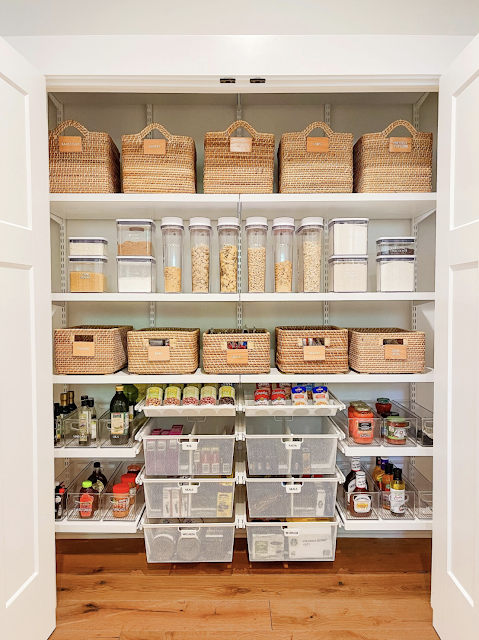
Look for alternative containers made out of materials like as hyacinth, rattan, and jute to arrange your belongings rather than purchasing plastic, which adds to the amount of waste that ends up in landfills. According to Larsen, other viable solutions include "glass jars with bamboo tops," "baskets created with natural materials," and "organized bins built from recyclable plastic."

2. Matching Minimalism

The practice of minimalism is more than just a fad; it's a way of life. Adopting the mindset that "less is more" can result in less clutter and more free space in your home or office. As with sustainability, minimalism is not a new concept; nevertheless, there is a contemporary spin on the concept that I've seen both on social media and in real life.

Especially in the kitchen, the days of mismatched and excessive goods are quickly becoming a thing of the past. Homeowners are ditching their collector mugs and souvenir cups in favor of sets that are more streamlined and come in transparent or neutral colors. Being your own at-home barista, which began as a method to keep safe during the epidemic and has evolved into a way to save money, feels extravagant when you use a handmade textured cup and gold spoon. This was initially a way to stay safe during the pandemic. An additional advantage is that the overall appearance of the cabinets and counters is cleaner and more organized after the renovation. Consider this trend to be the 21st-century equivalent of the traditional practice of collecting china.

3. Upgraded Private Offices in the Home

One storage trend that is continuing to gain popularity is the renovation of rooms in which people work from home. "As we go towards 2023, we think people will really lean into constructing raised, useful home workstations," says Ashley Murphy, cofounder and CEO of Neat Method. "We think people will really lean towards creating elevated, functional home workstations." "It is becoming abundantly evident that remote and hybrid employment will continue to be prevalent in the workforce. Because of this, more and more people are beginning to make long-term investments in the areas that they use for their home offices.

Even if your business has resumed operations and moved back into its old office space, having a specific area in your home where you can complete administrative tasks or pay bills is still quite desirable. The good news is that there are currently on the market more workplace organization products than ever before that are both appealing to the eye and readily available to meet your requirements. "Whether it's renovating your desk drawers or building onto your existing storage solutions, we anticipate that this will be a large focus in the year ahead, as consumers aim to improve both their productivity and the atmosphere in which they work from home. This could include anything from "says Murphy.

4. Individualized Space-Saving Solutions

Over the past few years, there has been an increase in interest in projects relating to home improvement, such as the installation of custom closets and kitchens, which not only maximize storage but also make a space work for a family. However, many house modifications have been hampered by the high cost of lumber as well as delays caused by shipment. This is where the more cost-effective alternatives come into play.

As an alternative to purchasing pricey cabinetry, many of my customers are deciding to have track systems installed, such as the Elfa line sold at The Container Store. Both the wooden and the metal tracks require an investment; however, the investment required for the track systems is far less than that required for the wood. They also have the ability to be customized, such as by rearranging the shelves or adding drawers, so that they may develop alongside you and your belongings.

If you are planning on renovating a room in 2023, you should give equal weight to the functionality of the area, if not more weight. In your new kitchen, for example, you could want to include sliding cabinets for the garbage and recyclables, an appliance garage that tucks away your toaster, and built-in spice racks.

5. The Completeness of the Pantry

The pantry is quickly becoming the most important room in the house, despite the fact that the kitchen is traditionally thought of as the heart of the home. Kristy Potgieter, CEO and founder of Sortifi, the first online tool designed for professional organizers to plan spaces and products for clients, looked into their recent data and identified the new organization hot spot. Sortifi is the first online tool designed for professional organizers to plan spaces and products for clients. As we get closer to the end of the year, we are noticing an upsurge in the number of different designs for pantries. According to Potgieter, "since pantries are such an important component of the house, more and more individuals are prioritizing the space in their homes to provide for one."

The preparation of meals, storage for weekend snacks and supplies for baking are just a few of the many functions that pantries perform in the kitchen. However, if your pantry does not have any sort of organization, it is far more likely to become a central location for stale food, which will lead to clutter and unneeded waste. With the help of products like stackable and space-saving food containers that allow you to decant dried goods to your heart's content, intentional pantry organization designs are on the increase. These containers can be found at grocery stores and home improvement stores.

How to Arrange Living Room Furniture


It can be difficult to arrange the furniture in a living room with a TV. Filling a room around your gadgets in a way that is both functional and visually beautiful can seem like a daunting challenge when you are presented with an empty space. But through time, interior designers have learned a few straightforward, practical rules that help your TV appear beautiful in your living room. If you simply adhere to these common sense guidelines, you'll discover that placing furniture—TV included or not—isn't quite as intimidating as you might have thought.

Consider The Most Popular Furniture Layouts

Consider classic living room designs that designers frequently use to create the most attractive spaces to narrow down your possibilities. Here are a few examples of how to arrange furniture in a living room.

  • Symmetrical Layout: Because it visually balances the area, a symmetrical layout works in any size or form of room. A symmetrical arrangement would have two sofas facing one another, separated by a table. A symmetrical couch is one that has matching side chairs on either side of it.
  • Floating Layout: Choose a floating furniture layout if your living room has a lot of windows but not enough wall space to attach your furniture. To create an island in the middle of the room with a TV installed on one wall, place your furniture a few feet away from the walls.
  • L-shaped Layout: An L-shaped living room and dining room combo is regarded as an awkward area and comes with its own set of difficulties, including a lack of available wall space for placing furniture and a TV. The sofa sits on the long wall and the TV can be placed on the wall directly in front of the sofa in rooms with two walls that can be used for furniture placement.
  • Layouts for Irregular Rooms: Asymmetrical or awkward-shaped rooms include those that are narrow, have nooks and crannies, or have fireplaces that are at an angle. Create zones with furniture by placing it on area rugs in awkwardly shaped living rooms. A striking floor lamp or another large statement piece can serve as an additional anchor for a space.
  • Layouts for Long, Narrow Rectangular Living Rooms: Since there are two long walls available, it's typical to position the sofa against one wall and the TV—whether mounted or on a stand—against the other.

Decide on a Focal Point

Never undervalue a room's main point's influence. They can be created intentionally, like with TV stands and televisions, or they might come organically, like if you have a large window or a built-in fireplace mantel. Decide on a focus point and stay with it, whatever that may be. Furniture should be placed as closely as feasible to it.

Avoid Pushing Furniture Up Against Walls

The size of the room will determine how far you can draw your furniture away from the walls, but even in a small room, you should leave a few inches between the backs of furniture pieces and the walls to give the items some breathing room. Contrary to popular assumption, this little piece of area might really provide the illusion that a room is larger. Naturally, if you have a larger room, feel free to arrange the furniture so that conversation areas are made in the middle of the space, allowing a few feet between the furniture and the walls.

Identify TV Position

The size of your TV and a few other things may affect where you put it in your living room. Here are some pointers:

  • The area of your living room where the TV is to be positioned should not be exposed to direct sunlight or glare from other types of illumination.
  • Keep your TV away from busy places. Nothing is more annoying than attempting to watch TV while people are constantly passing by.
  • Generally speaking, your TV should face your sitting so you can watch it comfortably from your couch or chairs.
  • There are advantages and disadvantages to mounting a TV over a fireplace, but if done properly, it can free up floor space in a tiny living room layout.

Make Conversational Spaces

Without having to strain their necks or shout across the room, people ought to be able to naturally communicate with one another. Place the couches and chairs close enough to one another so that people can talk without raising their voices, but not necessarily facing one another directly. Create additional chat spaces if the space is too vast.

Find Balance When Arranging Furniture

When placing furniture and other items in your living room, balance is especially crucial for décor. A room can feel uneven and a little disturbing if all the large or little pieces are grouped in one spot or on one side of the room, so take into account the size and location of the various components. Make sure the shapes are varied as well; if your seating is straight, for instance, think about a spherical coffee table.

Think about Traffic Flow

Traffic flow is one of the most crucial factors to take into account when placing furniture in any room. To move through the room, people shouldn't have to trip over the furniture or each other. A few feet, give or take a few inches, should be left between the coffee table and sofa as well as between the chairs. Make a path that is clear so that people may easily move from one end of the room to the other.

Use Rugs of the Correct Size

Area rugs should be placed below all of the furniture, if possible. It's acceptable to expose some flooring at the room's edges, but if you use an area rug, make sure it's large enough to accommodate all the furniture in a seating arrangement. Large pieces should at the very least have their front legs resting on the rug.

Choose a Large Coffee Table

Larger is usually preferable when it comes to coffee tables. A big coffee table in the middle of a seating area serves both practical and aesthetic purposes. It serves as the room's focal point and provides lots of room for people to set their drinks down or for you to display your favorite accessories. Large tables are also simpler to get to from the chairs surrounding them. In light of this, be certain to leave enough space for traffic to pass between the furniture and the coffee table. Additionally, two smaller tables or other coffee table options can work well as a substitute if you can't find a large coffee table that suits your needs.

Place Tables at a Safe Distance

A side or coffee table should be easily reachable from every seat. Avoid seating arrangements that require people to get up from their chairs to place things down or get drinks. In relation to table height:

  • If it's not possible to have side or end tables at the same height as the nearest chair arms, lower is preferable.
  • Coffee tables should be at least as high as the seat of a chair or sofa.

Allow for Light

One of any room's most crucial components, lighting is frequently disregarded. Use a variety of floor lamps, table lamps, and overhead lighting at all times (and sconces, if you can). A floor light looks fantastic behind an accent chair or at the end of a sofa. On side tables, bookcases, and even mantels, table lamps look charming. Use a range of fixtures widely all throughout your room as balanced lighting requires placement at various levels.

Use the Appropriate Art Size

Whether they are pieces of art, mirrors, or sculptural sculptures, anything that hang on walls need to be positioned thoughtfully and in proportion to the furniture. Instead of hanging a tiny photo over the back of your sofa, for instance, use a huge piece that is around two-thirds its length or a collection of pieces. If you must use a piece of art that is too little, enclose it in a wider frame and a larger matte so it may stand out when placed next to a huge piece of furniture.

Bringing Everything Together

If your plan involves purchasing new items, it is best to plan ahead when it comes to furniture and accessories arrangement. To draft your ideal floor plan, use either a traditional piece of graph paper or an online floor planner. The only surefire way to determine whether or not things will work out as you want is to do it.

How Long Does a Bathroom Remodel Take?


It can be frustrating to try to estimate how long a bathroom renovation will take. Once you believe you've got the timetable set, it all changes. Worker illness, late delivery of materials, non-payment, or unforeseen structural problems can all occur.

And nowhere is an accurate estimate more crucial than here, since most homeowners find it essential to have their bathrooms up and running as soon as possible. Unless you're lucky enough to have several bathrooms, leaving the only bathroom incapacitated during remodeling is a major inconvenience.

How Long Does It Take to Remodel a Bathroom?

Under perfect conditions, it should take approximately 23 days to finish renovating a modestly sized bathroom from top to bottom. If there are no interruptions in the flow of work and it is assumed that no work is done on the weekends, this equates to approximately four and a half weeks, which is slightly longer than one month. In the real world, where there is always the possibility of downtime or unforeseen situations, the amount of time may be approximately doubled, coming in at 46 days, or around 9 weeks.

Time Required for Bathroom Renovations and Its Affecting Factors

The truth is that it is extremely rare for a bathroom remodeling project to go exactly as planned, and a variety of factors can change your schedule even if you make the best possible efforts to do so:

  • Is the project going to be a superficial renovation or a rebuild from the ground up? The work could take as little as a few days or as much as many months, depending on the nature of the remodeling project that is being done.
  • Are you going to be the one doing the work, or are you going to hire a contractor? Doing all of the work yourself and fitting it in whenever you have free time might result in a project that takes as long as a year or longer to finish, according to more than one well-meaning homeowner who has made this discovery.
  • If you're going to hire someone else to do the work, you should ask whether the contractor is an owner-operator or whether they subcontract other tradespeople like electricians, plumbers, and carpenters. It's possible that hiring a remodeler who is a sole proprietor and operator will be the most cost-effective option. However, because they are trying to complete all of the work by themselves, that individual will most likely be working at your job in addition to a number of other tasks. This indicates that a task that needs 10 or 15 actual workdays to complete could take anywhere from two to three months to finish.
  • Are all of the materials easily accessible, or do you need to place special orders for some of them, which could cause a delay in delivery? For example, if imported ceramic tile needs to be ordered, the completion of a project could be delayed by several weeks.

However, if you are working with a capable general contractor who is working with equally capable subcontractors, it is typically not too difficult to come up with a rough estimate of how long it will take to completely remodel a small bathroom. This is because the subcontractors working on the project will be equally skilled.

Be Well-Prepared for Anything that May Arise.

The following schedule is based on the assumption that the work is being carried out by an experienced general contractor who is collaborating with qualified subcontractors, that all tradespeople show up on time, that no one gets sick, and that materials are easily accessible. On the client side, there is also the possibility of slowdowns. You, as the homeowner, are responsible for making payments on time and refraining from issuing any change orders that are not essential, as this will slow down the construction.

Most significantly, this is a perfectized version of the schedule. Dead days have been eliminated, and all workdays have been condensed in order to ensure that there are no voids in the schedule. It presupposes that as soon as one worker finishes their shift, the next one steps in quickly to take their place. Again, you should not be surprised if the actual schedule is around twice as long as this idealized one.

TASK ALLOTTED
TIME
(DAYS)
NOTES
Demolition 2 Laborious labor that could take far longer than expected if the restroom is located on the second storey or if it is otherwise challenging to remove waste.
Rough Carpentry 2 It is possible that you will not require any carpentry work if the structure beneath the surface is in good shape.
Plumbing Rough-In 1-2 If you are moving services like a tub or toilet, you should plan on devoting at least two full days to the task.
Electrical Rough-In 1-2 Because a skilled and experienced electrician can work quickly, it is highly unlikely that this will take more than a day to complete. The process of running the electrical lines but stopping short of hooking up the final connections is what is meant by the term "rough-in."
First Inspection 1 The initial examination that takes place before finishing off the work with drywall is relatively quick and shouldn't add more than one day to the overall schedule. However, because it can be difficult to schedule inspectors, this may cause the remodeling project to be delayed by one or two weeks.
Insulation 5 Because there are typically just one or two walls to insulate in a bathroom, the process should go quite quickly. Bear in mind that in some areas an insulation inspection is required, which will cause this stage to take significantly more time than usual.
Hang Drywall 1 The installation of dry wall can begin as soon as the insulation is in place. Work for a contractor can be completed quickly here.
Finish Drywall 2 Putting the finishing touches on something involves applying joint compound, waiting for it to cure, sanding it, and sometimes doing it again.
Paint 1 Painting a bathroom when it is still in its raw state is a task that can be completed very quickly and with little effort. There is no need to mask anything, with the exception of the ceiling.
Final Inspection 1 The final inspection itself does not take very long, similar to the first inspection; it may take each inspector less than twenty minutes to complete. However, setting up an appointment with the inspector could potentially delay down your job.
Tile Work 2 Optional: you might not be working with tiles, but just like with drywall, there is an application and drying cycle that takes some time.
Cabinetry and Trim 1 Bathrooms don't typically have a lot of cabinetry, so completing this task shouldn't take too long. Cabinets are typically stock cabinets or semi-custom cabinets that have been partially or fully assembled before being purchased.
Flooring 2 A simple vinyl floor could be installed in a morning; however, installing tile, engineered wood, or any other type of flooring will take more time.
Hookups, Fixtures, Etc. 2 Hooking up toilet, sink, etc.
Miscellaneous 1.5 Make room in your schedule for unplanned events.
TOTAL 23

3 Ways to Expend a Bathroom Remodel

As the customer getting a bathroom redesign, you have little control over the uncontrolled factors. But you can control elements on your end. In the event that you have completed all of these tasks, the schedule for the bathroom renovation will be sent back to the contractor:
  • Ensure that all payments are made on time or ahead of schedule. Contractors are reliant on you to make payments because they, in turn, need to pay other individuals.
  • Maintain constant communication with the contractor by promptly responding to any calls, texts, or emails they send your way. If you delay getting back to the contractor for an additional day, you will push the entire schedule back by one day.
  • You should try to avoid making unneeded adjustments by asking yourself if you are OK with the situation before signing the initial contract. If the project is finished exactly according to these standards, do you think you will be happy with the results?

How Much Does Dishwasher Installation Cost?


Cost of Installing a Dishwasher

The typical homeowner will pay between $185 and $225 on labor alone, which amounts to an average cost of $200 to install a dishwasher. Nevertheless, depending on what needs to be done, your installation may necessitate modifications to the plumbing, wiring, or countertops, which might increase your cost up to $485.

Dishwasher Installation Cost
National Average Cost $200
Minimum Cost $145
Maximum Cost $485
Average Range $185 to $225

Average Price of A Dishwasher Installation

Whether or whether your dishwasher will fit in the designated space (beneath the countertop) or if you will need to build new cabinetry around it will depend on where you live, the size of your project, and other factors. Also keep in mind that the typical cost to install a dishwasher is between $185 and $225, and that this is for simple work with medium-quality components. Add the additional expense of using high-end materials.

From nearby home improvement retailers, the following are typical installation costs:
Store Average Cost
Lowe's $125 - $450
Home Depot $99 + $19.99 Install Kit + $9.99 Adaptor
Best Buy $159.99
Remember that this is for a straightforward 30-minute installation in pre-prepared homes with no alterations needed. Additionally, the cost to remove your old appliance is about $20. These home renovation shops cannot assist you if you require any plumbing, electrical, or countertop work. You must request cost estimates for dishwasher installation from HomeGuide experts.

Cost of Installing a Dishwasher at Home Depot

When you spend $396 or more at Home Depot, you may get basic installation for $99 and free delivery seven days a week. All installations will come with a $19.99 installation kit charge and a $9.99 adaptor fee. Any large appliance purchase that is less than $396 will incur a $59 delivery fee. Your old appliance will be hauled away or recycled.

Installation Cost for Dishwashers at Lowe

When you spend $396 or more at Lowe's, you may get basic installation for between $125 and $450 with free delivery seven days a week. Your old appliance will be hauled away or recycled.

Installation Cost for Dishwashers at Best Buy

Installation costs a flat rate of $159.99 at Best Buy, with free delivery available on purchases of $399 or more. Additionally, a professional installation might charge more if they need to purchase extra parts or if they have to remove your existing appliance.

Cost of Installing a Sears Dishwasher

We called Sears, but no one picked up or called us back. We advised choosing a different installation business.

What Is the Price of a New Dishwasher?

With most households paying between $400 and $700, the price of an under-the-cabinet dishwasher that needs 120-volt electrical and hot/cold water connections is in the $300-$3,000 range. Remember that this is only for the new dishwasher; additional work and materials for installation will need to be paid for.
  • Labor - A plumber installs the dishwasher using the existing electrical, water, and drain lines; secures the dishwasher; tests it for functionality; and fixes any leaks. He charges between $185 and 225 dollars, which also covers other setup, equipment, and area preparation costs. 2 hours or so are spent on labor.
  • Supplies - The costs can range from $5 to $23 per item and include mounting hardware, connections, fittings, and other installation-related items.

Cost Of Dishwasher Replacement Labor

A professional can easily remove the old unit, install the new one, and secure it because all the pipes, wiring, and other components are already present when replacing an existing dishwasher. However, the installation may entail changes to the wiring, plumbing, or even the worktops. Depending on what needs to be done to prepare the location, labor charges can range from $145 to $485. The typical labor cost is about $200 for simple wiring, plumbing, or countertop improvements. Additionally, cleanup costs alone could cost between $60 and $155.

Installing A New Dishwasher Will Cost Money

Labor for installing a new dishwasher ranges from $175 to $525, with an average cost of $350. Installation can be more difficult if you've never owned a dishwasher or live in a house without one. Prior to installing pipes or adding additional space, you must first pay for the necessary wiring (which includes a circuit breaker) and counter space. The price will vary depending on how many specialists you require.
  • Carpenter: $74 per hour to create or customize any countertop and cabinet space. Hours vary depending on how much customisation is required.
  • Plumber: $86 per hour to build new drainage and water supply lines. 2.25 to 2 hours. Plumbing supplies range in price from $5 to $23.
  • Electrician: For extra wiring and installing high-voltage outlets, an electrician charges $80 per hour. a half-day.

Various Dishwasher Types

Dishwashers come in a wide variety of styles, including built-in, portable, countertop, front-control, top-control, freestanding, and more. We'll look at a handful and use The Home Depot prices:
  • Built-in dishwasher ($290–$2,890): Built-in dishwashers are the most popular and are generally available for purchase ($290–$2,890). These dishwashers offer a variety of advantages and functions. They are silent, which is a popular quality. They experience this because the cabinets around them serve as soundproofing. You won't have to worry about finding space for this equipment because it is typically included when buying a house. Because it is permanently attached to the plumbing, unlike portable dishwashers, it can be used for other purposes without having to be unplugged.
  • Countertop or compact dishwasher ($135–$375): If you move into an older property, you could see that the room is limited. To make up for this, consider a countertop or small dishwasher ($135–375). Countertop dishwashers can be connected to your sink pipes using a converter and function like a portable dishwasher. A typical dishwasher of this kind can fit roughly four place settings. Small families and persons on a limited budget should use this approach.
  • Portable dishwasher ($350–$630): Dishwashers that are portable are perfect for people who can't afford to install the piping required for a built-in dishwasher ($350–$630). The fact that they are portable and provide additional countertop space makes this option a wise choice, especially if you don't run many loads. Small families and those who live in apartments frequently select this type of dishwasher.
  • Freestanding dishwasher ($415–$1,950): Freestanding dishwashers range in price from $415 to $1,950. The advantage of this type of dishwasher is that you can place it at the end of the kitchen counter without taking up any cabinet space. Additionally, it can be fitted in little kitchens.
  • Under sink dishwasher ($445–$810): Dishwashers made by GE that fit under the sink range in price from $445 to $810 and measure 24 inches wide by 34 inches high by 24 inches deep.

Best Brands of Dishwashers

In the $595–$895 price range, the typical homeowner can locate an excellent dishwasher. These dishwashers work quite well and efficiently. But today there are sleek, Wi-Fi-enabled high-end dishwashers that start at $1,500 and have controls across the door that are hidden when the door is closed. They also include LED lights for when the dishwasher is opened and are stylish. Additionally, these washers provide various wash cycles designed especially for highly soiled clothes.
The Wi-Fi connectivity is intriguing because it allows you to remotely control your machine or receive updates about the wash cycle from your smartphone. You can even reorder dishwasher detergent with just one high-end dishwasher using Alexa and your smartphone. If your dishwasher is leaking, another model will send warnings.

Brands of Dishwashers Under $500

  • Whirpool $330
  • Kenmore $475
  • Amana $440
All three of the well-known dishwasher brands cost less than $500. Most of these received favorable reviews for how well they clean glassware and plates. And to top it all off, these dishwasher models use less energy. Fair enough, all of these dishwashers just have the most fundamental features. Although one of the three most well-known brands is Kenmore (a Sears brand), you should be aware that Sears has applied for bankruptcy protection.

The Best Dishwashers

  • Bosch Ascenta $630
  • Bosch Ascenta $510
  • Bosch 300 DLX Series $800
These dishwashers clean quite well and are quieter than the simpler versions. They also offer additional practical features like movable silverware bins, adjustable racks, soil sensors, and stainless steel tubs. You can also find additional finishes to suit your preferences, such as black, slate, stainless, bisque, and others.

The Best Expensive Dishwashers

  • Bosch Benchmark $1,600
  • Thermador $1,800
  • Thermador $2,300
With improved features like Wi-Fi connectivity, additional cycles, hidden controls, and specific wash zones for extremely filthy goods, these high-end dishwashers offer a streamlined appearance. Although the majority of expensive dishwashers function properly, some of them fall short of the more dependable, well-known brands (costing under $500) and the high-quality models (costing between $600-$900).

Additional Cost Considerations for Dishwashers

As was already said, installing your new dishwasher will incur additional costs.
  • Taking out and discarding the old dishwasher It will cost around $60 to remove it, and the plumber will give you a quote specifically for disposal. If your old dishwasher is still in good condition, several charity will come and pick it up. The hardware store will frequently carry and dispose of your old dishwasher at the same time as delivering your new one for a small fee of $20.
  • Issues with installing a dishwasher The following are some potential risks of a subpar installation:
  1. An electrical short that can result in a fire and significant damage.
  2. Flooding in the kitchen, possibly also in other rooms.
  3. The dishwasher may knock, bump, or other noises if it is not correctly anchored.
  • Building codes The following elements may also need to be included when installing a dishwasher in a new kitchen:
  1. Bringing any HVAC, electrical, or plumbing systems up to date with regards to building regulations.
  2. The price of testing for dangerous substances like lead and asbestos
  3. Fees for inspections or permits are necessary for plumbing and electrical work.
  • Delivery of equipment to and from the job site is charged at $59 by Home Depot and Lowe's for any major appliance purchases under $396. Delivery is free for appliances costing more than $396.

Questions and Answers

Is installing a dishwasher challenging?

Installation is simple as long as you have the necessary equipment and materials and are aware of how to shut off the water and power at the mains boxes. The drawback is that you must make sure that all hoses, pipes, and connectors are connected securely and in accordance with the manufacturer's recommendations. If you don't, you can wind up with a flooded kitchen, electrical problems, and an invalid warranty.

A dishwasher air gap is what?

A dishwasher air gap is a component that connects the dishwasher drain line to the home's drainage system and is located above or directly beneath the sink. It stops any recirculation of soiled dishwater into the dishwasher. Backflow prevention is required by all plumbing codes.

What are the typical dishwasher sizes and dimensions?

A built-in dishwasher typically measures 24 inches wide by 35 inches tall by 24 inches deep. A portable dishwasher typically measures 18 inches wide by 36 to 37 inches tall by 24 inches deep.

A dishwasher uses how much water?

The average Electricity Star-rated dishwasher uses 4 gallons of water per cycle instead of the typical 6 gallons, and it uses between 1.59 and 0.87 kWh of energy per load.

Who was the dishwasher's inventor?

Josephine Cochrane created the first industrial dishwasher in 1886. In Shelbyville, Illinois, a shed at the back of her home was used to create the first model. She used water pressure to clean the plates instead of scrubbers, which was a first. She had specialized racks in her dishwasher for holding plates, saucers, and cups. When the wheel was rotated by a motor, hot, soapy water shot out of the boiler and doused the dishes. She eventually obtained a patent for the idea, and the initial industrial dishwasher was manufactured. People have relied on the dishwasher ever since it rose to prominence in the 1950s as a common household item.

The Advantages of Setting Up a New Dishwasher

Dishwashers with the "ENERGY STAR" certification use cutting-edge technology to clean your dishes while using less water and energy.
  • Reduce your utility expenditures: The annual operating cost of a standard-sized ENERGY STAR certified dishwasher is roughly $35.
  • Save tons of water: Over the course of its lifespan, an ENERGY STAR certified dishwasher will typically save 3,870 gallons of water.
  • Save the environment: Dishwashers with the ENERGY STAR certification consume less energy than standard models, which helps fight air pollution and the effects of climate change.

How to Install Ceiling Fan Remote


You'll require:

TOOLS

  • 4-in-1 screwdriver
  • Ladder
  • Protective gloves

SUPPLIES

  • Remote receiver
  • Remote control
  • Wire nuts
  • Old screws
  • Batteries
  • Double-sided foam tape

Before going to sleep, you turn on your ceiling fan to its highest setting, but when you wake up in the middle of the night, it's freezing, and you have to drag yourself to the wall switch to change the speed. All of us have been there. Thankfully, there is a way to permanently do away with the wall switch and the hanging pull chain. Even if a ceiling fan didn't come with remote control functionality, it is fairly easy to add that functionality.

You'll soon be operating your ceiling fan from bed, as nature intended, if you follow these eight steps.

1. Make Ready to Install

Take some time to carry out safety checks before beginning the installation to make sure everything goes off without a hitch. Before turning off the fan with the wall switch, turn the fan on its highest setting. After that, proceed to your circuit breaker and turn off any power entering that junction box.

Finally, put on safety work gloves, grab the strongest ladder you have, and ask a friend to help you steady it while you work on the fan's internals. Compared to, say, installing a ceiling fan, this procedure is not nearly as risky, but it never hurts to be cautious.

2. Take Down the Canopy

The canopy of a ceiling fan is where the electrical parts are housed, and this is also where the remote receiver will be installed. The portion of the fan that is directly above the blades and below the wall is known as the canopy. The instructions that come with each fan will differ, so if you want to know how to get within the canopy, refer to those.

The majority of the time, you'll remove the fan's blades using a screwdriver, lay them away, and then take off the canopy with the same tool. To facilitate the final reattachment procedure, keep everything tidy, including any screws that have been removed.

3. Create a Connections Plan

You can see numerous cables and a capacitor inside the fan once the canopy's exterior has been removed. White, black, and red wires are required. The connection between the black and white wires and the capacitor will be broken by the remote receiver.

You should be able to identify which cables go to which receiver port by the color of your remote receiver. Consult the directions from the remote control receiver kit if the colors don't line up.

4. Connect the Receiver and Fix It

Once you are aware of the proper placement for the wires, make the required connections, using wire nuts to keep everything tight and secure. Locate a location inside the canopy for the remote receiver. Basically, you want to put it in a location where it won't interfere with any existing electronics.

Apply foam tape with a double-sided adhesive on the receiver. It's almost time to close the canopy after it is safe and you have successfully linked all of the wires to and from the receiver.

5. Examine the DIP Switch

Make a note of whatever dual in-line package (DIP) switch is turned on on the remote receiver before sealing the canopy and reassembling the fan. Though not always, these DIP switches are often found close to the battery on the bottom of the remote. Keep an eye out for a set of five switches. Adjust the receiver's switches so that they are in alignment with the remote's DIP switch locations because they must match.

You should read the manufacturer's instructions to find out the specifics of your model because not all remote control receiver kits include various DIP setting possibilities.

6. Reinstate the Fan

It's time to reassemble the fan now that the receiver has been inserted. Work in the opposite direction from how you exposed the canopy to reassemble the fan. Check the fan's instructions for details on how to repair the canopy as each fan is different.

After lining up the canopy with the ceiling, hold it firmly in place as you screw the individual components back in. If you had to remove the fan blades, follow the same steps to reattach them. You are welcome to pause for a moment to appreciate your craftsmanship.

7. Turn It on And Start Testing

Turn the wall switch to the on position when the fan has been constructed. After that, go downstairs to the circuit breaker and turn the switch to restore power to that area of your house. Make sure the DIP switch corresponds to the location of the receiver and put batteries into the remote control.

To make sure there is no interference, repeatedly turn on and off the ceiling fan while testing the remote control. If everything goes according to plan, the task is finished. Congratulations! Try some straightforward troubleshooting techniques if you're having problems.

8. If Needed, Troubleshooting

The correct troubleshooting procedures depend on the fan and remote you are using. Start by modifying the DIP switch settings on both the remote and the receiver to switch frequencies on the remote. Next, confirm that the wall switch and the circuit breaker are providing electricity to the ceiling fan. If none of those solutions work, get assistance from a skilled ceiling fan installer.

DIY vs. Professional Ceiling Fan Remote Installation

Even though installing a ceiling fan remote is a fairly straightforward task, some light electrical work can be required. Not all fans and remote controls will follow the instructions provided above. Since professionals can charge anywhere between $40 to $100 per hour to complete this work, doing it yourself will save you money on labor.

If you are completely perplexed, it's likely that your fan and receiver won't merge right away. If so, you'll need to replace the switch and the capacitor, which calls for hiring a local handyman at a rate of $60 to $125 per hour.

Furthermore, not every ceiling fan has enough space for the remote receiver. While "down-rod" fans may not have adequate room, most "ceiling-hugger" fans do. Engage a professional if you are experiencing problems with integration or space.

Who to Hire to Install or Repair Your Ceiling Fan?


When the weather gets warm in the summer, ceiling fans are excellent for moving air around your house and keeping you cool. But who should you call if your fan breaks down? Your greatest option for a ceiling fan repair is an electrician.

Benefits of Contracting an Electrician for Ceiling Fan Repair

You should always leave electrical repair work to a skilled ceiling fan repair professional unless you are a licensed electrician. Wiring mischief is risky and may land you in the hospital or maybe give you an electric shock. Furthermore, any repairs that call for a ladder are inherently risky because you run the risk of falling.

But leaving ceiling fan repair to a pro is not just for safety reasons. The wiring must be installed correctly for your ceiling fan to operate. Five distinct colored wires with precise connections are needed for ceiling fans, and some of the wires must be stripped to reveal the copper ends.

A expert will know how to fix different types of ceiling fans in addition to wiring them appropriately, and they'll make sure that your ceiling is not harmed in the process. Local electricians can repair your ceiling fan effectively since they are qualified, experienced, insured, and have access to the right tools. They know how to ensure that your ceiling fan is placed securely and that it is balanced.

Can I Fix My Ceiling Fan by Myself?

There are certain typical issues with ceiling fans that you can diagnose, even if you shouldn't DIY your ceiling fan for safety reasons. For instance, before concluding that faulty wiring is to blame if a remote control isn't working, it is clear to first try replacing the batteries. You might need to use the switch on the fan base to change the direction of the blades if the breeze in your room isn't strong enough.

However, you should call in a professional to do the repair if you have more serious issues like a wobbling fixture, light, or fan that isn't working or feel the wiring is defective.

Can I Employ a Handyman to Fix My Ceiling Fan?

You don't need to call an electrician if your ceiling fan is swaying or the blades are coming loose; instead, you can engage a nearby handyman to remedy the issue. You might think about having your go-to handyperson rewire your ceiling fan if they've done small electrical work before, but there's a bigger chance that they'll make a mistake or get hurt. A professional electrician should always be used for electrical work to guarantee that it is completed safely and correctly.

How Much Does Carpet Installation Cost?


Unlike any other flooring option on the market today, carpet brings warmth, elegance, and softness. There are countless carpet options for your home, with a huge selection of designs, styles, and fibers. It might even be difficult for you to pick just one carpet because there are so many stunning grays, soft neutrals, and even vibrant, vivid patterns to choose from!

One of the greatest methods to get ready before beginning a new improvement or remodel in your house is to do some cost research on the proposed project. If you anticipate needing new carpet, it's a smart idea to estimate carpet cost to have an idea of what to budget for. Educating yourself on the overall cost will have you ready before your job even begins, whether you want to install new carpet in just a few bedrooms or your entire house. The measurements of your room and the price per square foot of the carpet you're interested in are all you need to get started with our carpet cost calculator below.

How Much Does Carpeting a Room Cost?

The entire cost of placing carpet in a space depends on a variety of factors, including carpet pricing. The price of carpeting a room depends on the size of the space, the carpet's quality, its softness, thickness, density, and pile height. However, you should plan to spend, on average, between $3 and $4 per square foot of carpet.

When installing new carpet in your home, you'll also need to spend money on new carpet cushion, bringing the overall cost of your project to a total of. Even if you're replacing the carpet, you should get new carpet padding because the old one can hold onto previous spills, mishaps, and pet dander. It's advisable to spend money on new cushions in addition to new carpeting to start over. Depending on the style of cushion, carpet cushions might cost anywhere between.59 and.89 cents per square foot.

Do you need to know how much carpeting will cost for a particular room? To estimate the cost of carpeting for your home, use the carpet cost calculator below. Enter the room's measurements in feet and inches along with the carpet's price per square foot. Make sure to measure precisely so that our calculator can provide the most accurate estimate of your project. Use the calculator for each room in the project you want to estimate the cost of, and then combine the total costs of all the rooms together.

Remember that our calculator does not factor in the cost of a cushion or an allowance for overage. The precise amount required for your particular space can be determined by your local Carpet One Floor & Home flooring professional, who can also assist you in selecting the ideal carpet cushion.

Knowledge of Carpet Prices

The entire cost of laying carpet in a space depends on a variety of factors, including carpet costs. These considerations include the type of carpet used, its thickness, density, pile height, and the room's square footage. Let's examine these determinants of carpet price:

  • Material: Natural or synthetic fibers can be used to make carpet. Natural fibers are formed from organic materials like wool, sisal, jute, and silk while synthetic fibers are made of materials like nylon, polyester, olefin, and acrylic. Natural fiber carpet is typically more expensive than synthetic carpeting.
  • Carpet Types: There are many various carpet styles available, including cut pile, loop pile, berber, and cut-loop. Your price may change depending on the type of carpet you choose.
  • Thickness: The density of fibers in a rug pile is referred to as the carpet's thickness. A rug's thickness is calculated from the surface to the backing.
  • Density: Carpet density refers to how closely spaced each fiber strand is at the carpet's base and is based on the total number of fiber strands in the carpet. Higher density generally results in less matting and less signs of foot traffic, increasing the cost of the carpet product.
  • Pile Height: Three pile heights, low, medium, and high, are offered in carpet. The carpet is plusher and softer to the touch the higher the pile height.
  • Square Footage: The cost of your new carpet depends on the size of the room in which it will be installed. Although it may seem obvious, the more carpet you need to buy and the more square footage you need to cover, the more expensive the space will be altogether.

On average, you can anticipate paying $2 to $4 per square foot for carpet.

But the overall cost of the carpet doesn't stop there because you also need to account for labor fees and new carpet padding.

Other Factors Affecting Carpet Prices

Cost of Carpet Padding

When you put new carpet in your home, you must spend money on new carpet padding. Even if you're replacing the carpet, you should get new carpet padding because the old one can hold onto previous spills, mishaps, and pet dander. It's best to spend money on new carpet padding in addition to new carpet if you want to start again. Depending on the type of cushion used, carpet padding might cost anywhere from 0.59 to 0.89 cents per square foot.

Cost of Installing Carpet

The price of carpet installation varies, in addition to the price of carpet and carpet padding. The complexity of the installation, your region, the cost of labor in your zip code, the layout of your property, the type of subfloor you have, and the removal of existing flooring are all factors. For instance, because it takes more time, effort, and skill to finish the project, you should prepare to pay a little more if you want to lay carpet on your interior stairs and a corridor. Additionally, since the carpet needs to be tailored to fit around the spindles, steps with spindles can be even trickier to install.

Additionally, moving furniture and removing existing flooring will raise the cost of installation, particularly if the previous flooring is difficult to work with or takes a long time to remove. Remember these items when looking for new carpet because it's likely that at least one of the aforementioned characteristics exists in your home.

More Info About Carpet Costs

It's ideal to order between 10% and 15% extra carpet than you need to ensure that you have enough for your project. There will need to be extra carpet cuts in some rooms because of the numerous angles. This necessitates ordering extra carpet. Since the quantity of carpet you should order depends largely on the particulars of your room, it is preferable to consult with your sales representative.

When creating a budget for your flooring project, you must take other costs and aspects into account in addition to the price of the flooring materials. Read our Associated Expenditures guide to have a better understanding of what other costs can be involved with your flooring job.

Calculating the Total Cost of Your Project

When calculating the entire project cost for your new carpet, take into account all the following:

  • Carpet costs
  • Padded carpet
  • Cost of installing carpet

Remember that the overall project cost can change depending on the selections and site conditions. We advise requesting a free estimate from the Carpet One Floor & Home staff. Our carpet cost estimator, which can be seen above, uses the size of your space and the price of your carpet product to get an estimate of carpet pricing if all you're concerned about right now is figuring out the cost of carpet supplies.

Free How-To Tutorials

Search This Blog

Menu Halaman Statis